

Trophy Roadmap:
Difficulty: 3/10
Estimated time to Platinum: 8 – 10 hours
Trophies: 40. ![]() 1 /
1 / ![]() 4 /
4 / ![]() 8 /
8 / ![]() 27
27
Missable trophies: 7 – ![]() Roundabout!,
Roundabout!, ![]() Dodge This!,
Dodge This!, ![]() Rhythm Heaven!,
Rhythm Heaven!, ![]() Paddle Champion,
Paddle Champion, ![]() Jackpot!,
Jackpot!, ![]() Practice Makes Perfect, and
Practice Makes Perfect, and ![]() It’s Super Effective!, but please note that while they are missable, it’s very unlikely you’ll actually miss them
It’s Super Effective!, but please note that while they are missable, it’s very unlikely you’ll actually miss them
Glitched trophies: 1 – ![]() Bulletin Board Service, but it’s due to a minor glitch in the game that will block you from the trophy if you go the wrong way in the 3rd area (Sanctum of Self). See below for more info.
Bulletin Board Service, but it’s due to a minor glitch in the game that will block you from the trophy if you go the wrong way in the 3rd area (Sanctum of Self). See below for more info.
Difficulty related: None
Playthrough: 1 + Cleanup
Introduction:
Welcome to the Rainbow Billy: The Curse of the Leviathan trophy guide!
After a celebration of color is abruptly interrupted by an evil Leviathan, Billy’s world turns from bright and colorful to dark and grey. After escaping the color-seeping Leviathan, Billy will need to return the vibrance to his world by collecting creatures who have turned dark. With each creature he rescues, he adds a new companion to his repertoire that will help him in defeating the dreaded Leviathan.
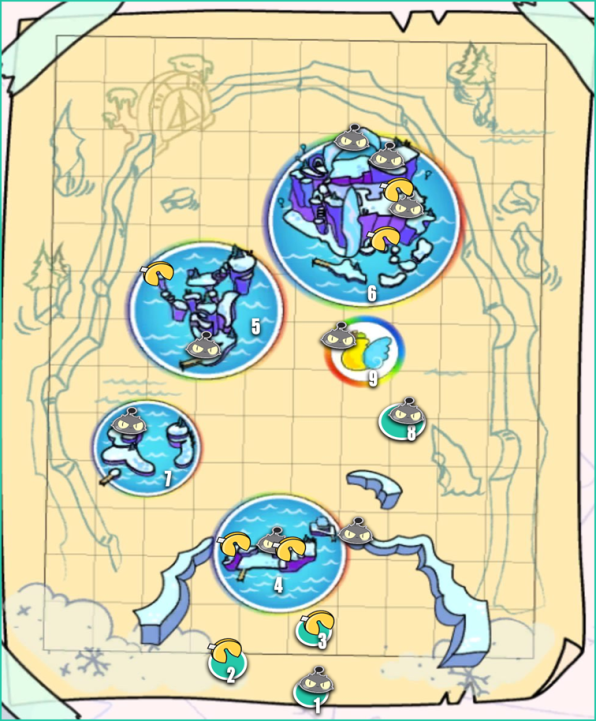
Glitch Warning: This is a temporary glitch that is currently being fixed, but there is a encountered in the Sanctum of Self that will block you out of ![]() Bulletin Board Service. if you miss it. After completing the 1st Trial, you’ll need to head down to the 2nd Trial island which is Southwest from the central Pyramid. When you have to go there, go directly South. There is an island just before the Trial island that you need to land on first (if you’re looking at the maps provided under
Bulletin Board Service. if you miss it. After completing the 1st Trial, you’ll need to head down to the 2nd Trial island which is Southwest from the central Pyramid. When you have to go there, go directly South. There is an island just before the Trial island that you need to land on first (if you’re looking at the maps provided under ![]() Bestest Friend and
Bestest Friend and ![]() Many Thoughts, Head Empty., these are Island 4 and 5). Kabushi is on Island 4 and is supposed to be a non-skippable fight. When you defeat him, you are rewarded a Thought. If you go around this island and don’t encounter him before completing the second trial, Kabushi will be added to your creature inventory after defeating Klunkey, but you will not receive the Thought he is supposed to reward you. You need all 90 Thoughts for the Upgrades so missing this one will block you out of
Many Thoughts, Head Empty., these are Island 4 and 5). Kabushi is on Island 4 and is supposed to be a non-skippable fight. When you defeat him, you are rewarded a Thought. If you go around this island and don’t encounter him before completing the second trial, Kabushi will be added to your creature inventory after defeating Klunkey, but you will not receive the Thought he is supposed to reward you. You need all 90 Thoughts for the Upgrades so missing this one will block you out of ![]() Bulletin Board Service..
Bulletin Board Service..
Roadmap:
Step 1: Play the game while collecting what you can and levelling up the friendship levels of the creatures
Don’t worry too much about going far out of your way to collect every tiny little thing on your initial run, there will be freeplay available after you complete the game. You do want to go for what you can at least see so the clean-up isn’t as tedious later on. Make sure you’re fishing at every fishing spot you come across, whether or not it has a gift or not (you’ll need to fish for the creatures). You can stick to the main path and finish the game kind of quickly if you don’t mind cleaning up most of the collectibles after the finishing the game, but again, just make sure you’re levelling up the friendship levels of your creatures as often as you can to make the altercations easier (and a little quicker). Also make sure you’re not spending any of your coins until ![]() Ultra-Rich unlocks so you don’t make that trophy harder than it has to be. The trophies listed below are guaranteed for this step, but do take mind that you’ll more than likely earn a few miscellaneous trophies as well, they’ll just be listed under Step 2.
Ultra-Rich unlocks so you don’t make that trophy harder than it has to be. The trophies listed below are guaranteed for this step, but do take mind that you’ll more than likely earn a few miscellaneous trophies as well, they’ll just be listed under Step 2.
You’ll be earning these trophies:
![]() Riches and Recognition
Riches and Recognition
![]() No Fears Getting You Down
No Fears Getting You Down
![]() Me and My Shadow
Me and My Shadow
![]() True Colors
True Colors
Step 2: Clean-up
Now that you’ve completed the game, you’ll have unlimited fuel for your boat and can travel anywhere and everywhere. You’ll also be able to reach any places requiring the balloon or the glider, so no collectible will be out of reach. Just as with step 1, you still want to make sure you stop at any fishing spot you come across, whether or not is has a gift. The Thought and Creature locations are all listed under their respective trophies in the order they will appear in your journal, so if you’re missing any, please reference those for their locations. Be sure to use your fast travel as well since it can save you a LOT of time and do remember that you can fast travel between “worlds” as well, it doesn’t have to be just the area you’re currently in.
During this step you’ll earn these trophies:
![]() Passive-Supportive
Passive-Supportive
![]() Friendly Benefits
Friendly Benefits
![]() Great Friend
Great Friend
![]() Roundabout!
Roundabout!
![]() Dodge This!
Dodge This!
![]() Rhythm Heaven!
Rhythm Heaven!
![]() Paddle Champion!
Paddle Champion!
![]() Jackpot!
Jackpot!
![]() Practice Makes Perfect
Practice Makes Perfect
![]() It’s super effective!
It’s super effective!
![]() Who would’ve Thought?
Who would’ve Thought?
![]() Think it through!
Think it through!
![]() Thought Process.
Thought Process.
![]() There are no monkeys in these!
There are no monkeys in these!
![]() Window Shopping
Window Shopping
![]() Your plumber is in another game!
Your plumber is in another game!
![]() Top of the World
Top of the World
![]() Kickstarting the Conversation
Kickstarting the Conversation
![]() Dino Dino Revolution
Dino Dino Revolution
![]() Now It’s Time to Take Flight
Now It’s Time to Take Flight
![]() Property Damage
Property Damage
![]() Fast Traveler
Fast Traveler
![]() American Idle
American Idle
![]() Deep-Sea Cleaning
Deep-Sea Cleaning
![]() Gummi Gourmet
Gummi Gourmet
![]() Variety is the Spice of Life
Variety is the Spice of Life
![]() That’s pretty deep
That’s pretty deep
![]() Best Friend
Best Friend
![]() You’re overthinking this…
You’re overthinking this…
![]() Gotta befriend ’em all!
Gotta befriend ’em all!
![]() Muckraker
Muckraker
![]() Ultra-Rich
Ultra-Rich
![]() Bestest Friend
Bestest Friend
![]() Many Thoughts, Head Empty.
Many Thoughts, Head Empty.
![]() Bulletin Board Service.
Bulletin Board Service.
![]() See You Next Time!
See You Next Time!
If you liked this guide, you’ll find more on our site.
You can also chat to our writers and friends by joining us on Discord with this link – Discord Invite
Trophy Guide:
 Earn every Trophy. |
Earn all of the other trophies in the game to unlock this Platinum trophy.
 Fight toxic masculinity and befriend Dragalant. |
Story Related.
Dragalant is the first boss you’ll fight when you reach the end of Dinoland.
During the 1st phase of the fight, Dragalant will keep summoning Marshmallows that you need to attack. Each time you defeat one, it’ll fly onto the unstable rock in the middle of the fight area. After about 3-4 Marshmallows hit it, the volcano will erupt and the fight area will fill with lava which will start the 2nd phase.
During the 2nd phase, Dragalant will still summon 1-3 Marshmallows that you need to take out before you can start doing damage to Dragalant. If you don’t take the Marshmallows out before your turn ends, each one will shoot a fireball on your deck and set a random card on fire. If you use the flaming card, you’ll take damage, so make sure you’re prioritizing them so you have your full deck at your disposal.
After you “defeat” Dragalant, you’ll start phase 3 which will just be you running from a wall of lava. You’ll need to zigzag between obstacles, but once you reach the end, the encounter will officially be over and the trophy will unlock.
Face your fears and befriend Calypso. |
Story Related.
Calypso is the second boss you’ll fight when you reach the end of Frightfrost.
After you return all of the instruments to the musicians and interact with them in the Club, the fight with Calypso will start. During the 1st phase, Calypso will be guarded by the 4 musicians you just helped. You’ll need to take out all 4 before you can start attacking her. When choosing dialogue options, go for the ones that encourage the musicians to play their own music, ones that are “encouraging” overall, and ones that don’t tell Calypso any personal information about yourself. At the end of your turn, all 4 will do 1 single hit against you, but then 1-3 will send ice projectiles into your deck and freeze random cards. You won’t be able to use these until they melt, so you want to try and get the musicians done and out as soon as you can.
During phase 2, Calypso will summon the musician’s instruments to fight with her. There will be two at a time, leaving one lane open for you to attack Calypso. When you “defeat” the instruments, they’ll return to the musicians who are now standing on your side and power them up. If you don’t get them down before your turn ends, each instrument will toss 1-2 balls of ice that will freeze random cards in your deck, so you want to make sure you’re focusing on them and just wait to attack Calypso until you have no more attacks against the instruments. After all 4 instruments have been returned, you’ll have a new attack option called “Jazz”. Using this will cause the musicians to play their music and fill the rainbow hearts on Calypso’s HP. From here, you just want to keep attacking her until all of her symbols are full. When you’re done, the trophy will unlock.
Accept your other self and befriend Shadow Billy. |
Story Related.
Shadow Billy is the third boss you’ll fight when you reach the end of the Sanctum of Self.
Out of all of the “boss” fights, this one is the most straightforward. The only thing you really need to make sure you don’t do is do not attack Shadow Billy. Only attack the creatures he summons and leave him alone. You’ll end up taking a hefty amount of damage in the first half, but your old companion will help you out when you need it. In the second half, repeat the same process and attack only the creatures. With each one you take out, a large heart in the back will fill up a bit. Once it’s full, the encounter will end. You want to make sure you choose dialogue options that are about encouragement and acceptance during this fight.
 Raise 5 creatures’ friendships to Level 2! |
See ![]() Bestest Friend.
Bestest Friend.
Raise 30 creatures’ friendships to Level 2! |
See ![]() Bestest Friend.
Bestest Friend.
Raise 20 creatures’ friendships to Level 3! |
See ![]() Bestest Friend.
Bestest Friend.
Raise 40 creatures’ friendships to Level 3! |
See ![]() Bestest Friend.
Bestest Friend.
 Raise ALL creatures’ friendships to Level 2! |
The trophy description for this one is incorrect. You’ll need to get all of the creature’s friendships to Level 3, not level 2. In total, there are 80 creatures to befriend in the game (20 in each area). Each of them will accept 2 gifts which they’ll give you clues about (they’re also all listed below). These will get the friendship levels up to 2.5. The last .5 will come from feeding them fish gummies. All of the fish have a corresponding color symbol associated with them and each creature has 3 of these symbols. As long as you’re feeding them fish gummies that match their color icons, you shouldn’t have to feed them too many to get to Level 3.
The gifts are found through Fishing, digging up Dirt Piles, purchasing them from the shop (the shop is limited), and breaking up Fortune Cookies. For the Fishing, if the fishing spot has rainbow streaks coming out from the water, it means there is a gift in it. If there are no rainbow streaks, it’ll just be fish (which in all honesty, are still quite useful, so you should be fishing at each location you come to whether or not it has a gift). The Fortune Cookies and Shops will be in the same locations for everyone and will offer the same rewards, so please see the maps below for their locations and what’s inside of them. The list of each character’s requested gifts are as follows:
Dinoland

- Giro (Story Related – Island 1): Ice Cream, Teddy Bear
- Deedle-Dee (Story Related – Island 2): Friendship Bracelet, Paper Heart
- Eggins (Island 3): Video Game, LEGO Brick
- Vruu (Island 4): Pillow, Wrench
- Island 4 Fortune Cookie: Whoopie Cushion
- Glower (Island 5): Flower, Party Popper
- Biki-Riki (Island 6 / Shop Island): Doll, Ice Cream
- Island 6 / Shop Island Fortune Cookie: Flowers
- Island 6 / Shop: Friendship Bracelet x1 ($20)
- Island 6 / Shop: Video Game x1 ($35)
- Alpharoar (Island 7): Weights, Friendship Bracelet
- Booster (Island 8): Weights, Ice Cream
- Island 8 Fortune Cookie: Book
- Drecko (Island 8): Ice Cream, Paper Heart
- Bubboar (Island 8): Book, Friendship Bracelet
- Garoro (Island 9): Doll, Whoopie Cushion
- Island 9 Fortune Cookie: Teddy Bear
- Lavarilla (Island 7): Trophy, Weights
- Gryno (Island 7): Vinyl Record, Butterflies (Frame)
- Mipsy (Island 11): LEGO, Party Popper
- Island 11 Fortune Cookie: LEGO
- Bippo (Island 14): Flower, Weights
- Fripps (Island 16): Butterflies (Frame), Flowers
- Twax (Island 18): Doll, Video Game
- Island 18 Fortune Cookie: Friendship Bracelet
- Jackopy (Island 20): Butterflies (Frame), Book
- Jarjomp (Island 23): Party Popper, Vinyl Record
- Triggor (Island 24 – accessible after you beat Calypso): Wrench, LEGO Brick
- Chamble (Island 25 – accessible after you beat Calypso): Book, Trophy
Frightfrost
-
- Island 2 Fortune Cookie: LEGO
- Island 3 Fortune Cookie: Ice Cream
- Flapjack (Island 4): Ice Cream, Video Game
- Island 4 Fortune Cookie: Trophy
- Island 4 Fortune Cookie: Paper Heart
- Bark (Island 5): Teddy Bear, Friendship Bracelet
- Island 5 Fortune Cookie: Friendship Bracelet
- Island 5 Fortune Cookie (by Zoggy): Wrench
- Whabam (Island 6): Weights, Paper Heart
- Island 6 Fortune Cookie: Weights
- Island 6 Fortune Cookie: Party Popper
- Pimboh (Island 6 – After beating Calypso, go around the left side of the mountain through the obstacle course): Doll, Weights
- Dippy (Island 7): Doll, Vinyl Record
- Gumpus (Island 9 shop):
- Island 9 Shop: Ice Cream x1 ($20)
- Island 9 Shop: Teddy Bear x1 (#35)
- Zoggy (Island 5 – Available after you defeat Calypso): LEGO Brick, Doll
Sunken Harbor

- Boln (Island 1): Pillow, Vinyl Record
- Island 1 Fortune Cookie (On botton half of the broken ship near the entrance, below the graveyard): Ice Cream
- Skulliwag (Island 2 – Club/Shop): Vinyl Record, Wrench
- Island 2 Shop: Pillow x1 ($20)
- Island 2 Shop: LEGO x1 ($35)
- Peakabuu (Island 3): LEGO Brick, Teddy Bear
- Island 3 Fortune Cookie: LEGO
- Island 3 Fortune Cookie (in the drumstick room): Vinyl Record
- Hydrilly (Island 3): Vinyl Record, Paints
- Rhododondo (Island 4): Trophy, Party Popper
- Island 4 Fortune Cookie: Doll
- Forogoro (Island 4 – after you get the “toot toot”): Wrench, Pillow
- Oowoo (Island 5): Trophy, Paints
- Koobie (Island 6): Doll, Teddy Bear
- Whispurr (Island 6 – after you get the Guitar): Book, Butterflies (Frame)
- Island 6 Fortune Cookie (Requires Glider): Teddy Bear
- Gargando (Island 1 – after you beat Calypso, go around the entrance ship and on the top right side of it will be a hole you can now enter to find him): Wrench, Trophy
- Shellican (Island 6 – requires Glider): Butterflies (Frame), Party Popper
- Clobbs (Island 2 – Club – Available after completing the Sanctum of Self, speak with Klobbs): Paper Heart, Feathers
- Woogle (Island 1 – requires Glider, right side of the “indoor” area between Frightfrost and Sunken Harbor): Friendship Bracelet, Paper Heart
Sanctum of Self

- Prickle (Island 1): Whoopie Cushion, Book
- Island 1 Fortune Cookie (Under left most portion of the bridge, you can interact with it while standing on top of the bridge): Pillow
- Bunglebee (Between Island 1 and 2 after the bridge breaks and you learn how to Glide): Trophy, Fish used for Level 2
- Mantadora (Island 2, bottom of the Pyramid): Paper Heart, Friendship Bracelet
- Flokka (Island 3, follow the air streams around the building on the right): Ice Cream, LEGO Brick
- Spirelli (Island 3, on the first floor of the building, left room): Vinyl Record, Book
- Tumby (Island 3, after completing the puzzle on the 2nd floor, he’ll be outside): Ice Cream, Paper Heart
- Island 3 Fortune Cookie (After completing the 3rd puzzle): Friendship Bracelet
- Gonk (Island 3, after completing the 3rd puzzle, he’ll be outside): Teddy Bear, Paints
- Island 3 Fortune Cookie (Along the outer wall): Wrench
- Kabushi (Island 4): Friendship Bracelet, Trophy
- Island 4 Fortune Cookie: Paints
- Webble (Island 5 – after completing the 2nd puzzle, don’t go down through the next door and instead, go through the door on top/ the back wall and cross over the leaves): Paints, Vinyl Record
- Island 5 Fortune Cookie (Instead of jumping across the leaves to reach Webble, jump towards the screen to a hidden ledge): Video Game
- Klunkey (Island 5, after completing the 3rd puzzle, he’ll be in the main path): Book, Paper Heart
- Island “6” Fortune Cookie: On the bottom of the left pillar between Islands 3 and 6: Friendship Bracelet
- Mosslow (Island 6, Story Related): Pillow, Trophy
- Duwilly (Island 6, after asking Mosslow to move, they’re up on the right): Paper Heart Flowers
- Cahoots (Island 6, in the 2nd puzzle room, bottom right island): Book, Paints
- Riki-Biki (Island 6, in the room where you have to move the snowball along the zig-zag platform): Video Game, Whoopie Cushion
- Bombous (Island 3, after defeating Shadow Billy, he’s on the backside of the top of the Pyramid): Wrench, Pillow
- Solero (Island 6: He starts on the left side of the Pyramid then will go to the right side – you will get both Solero and Lunaris here but will only need to fight one of them): Whoopie Cushion, Party Popper
- Lunaris (Island 6 – He starts on the left side of the Pyramid then will go to the right side – you will get both Solero and Lunaris here but will only need to fight one of them): Paints, Ice Cream
- Island 6 Fortune Cookies (x3 – On the lowest green tier of the Pyramid, go around the back to find the cookies all together): Party Popper, Vinyl Record, and Book
- Kamemelon (Island 7): Whoopie Cushion, Friendship Bracelet
- Tokalotl (Island 9 – Shop): Party Popper, Butterflies (Frame)
- Island 9 Shop: Whoopie Cushion x1 ($20)
- Island 9 Shop: Paper Heart x1 ($35)
- PettyKott (Island 10): Flowers, Book
Flawlessly complete a difficult “Circle” attack minigame! |
Missable.
While this is missable, it’s highly unlikely you’ll actually miss it as you’ll be using all of the different attacks throughout the game. When you’re in a battle, you’ll need to use two creature for this trophy. The 1st creature you play must have the “Circle” attack. This includes the following creatures:
- Vruu
- Glower
- Drecko
- Bubboar
- Twax
- Triggor
- Peekabu
- Dippy
- Pimboh
- Forogoro
- Whispurr
- Lunaris
- Solero
The second creature you can play can be any, you just need to make sure they’re placed on the same line as your 1st creature. When the minigame portion starts, the Circle minigame will be a little bit harder since there’s an additional creature attacking. Complete the minigame without missing any buttons and the trophy will unlock.
Flawlessly complete a difficult “Dodge” attack minigame! |
Missable.
While this is missable, it’s highly unlikely you’ll actually miss it as you’ll be using all of the different attacks throughout the game. When you’re in a battle, you’ll need to use two creature for this trophy. The 1st creature you play must have the “Dodge” attack. This includes the following creatures:
- Garoro
- Hydrilly
- Clobbs
- Webble
- Mantadora
- Klunkey
- Prickle
- Pettykott
- Flokka
- Bunglebee
The second creature you can play can be any, you just need to make sure they’re placed on the same line as your 1st creature. When the minigame portion starts, the Dodge minigame will be a little bit harder since there’s an additional creature attacking. Complete the minigame without missing any buttons and the trophy will unlock.
Flawlessly complete a difficult “Line” attack minigame! |
Missable.
While this is missable, it’s highly unlikely you’ll actually miss it as you’ll be using all of the different attacks throughout the game. When you’re in a battle, you’ll need to use two creature for this trophy. The 1st creature you play must have the “Line” attack. This includes the following creatures:
- Giro
- Deedle-Dee
- Biki-Riki
- Lavarilla
- Gryno
- Mipsy
- Bippo
- Fripps
- Whabam
- Gargando
- Skulliwag
- Bombous
- Riki-Biki
- Mosslow
The second creature you can play can be any, you just need to make sure they’re placed on the same line as your 1st creature. When the minigame portion starts, the Line minigame will be a little bit harder since there’s an additional creature attacking. Complete the minigame without missing any buttons and the trophy will unlock.
Flawlessly complete a difficult “Paddle” attack minigame! |
Missable.
While this is missable, it’s highly unlikely you’ll actually miss it as you’ll be using all of the different attacks throughout the game. When you’re in a battle, you’ll need to use two creature for this trophy. The 1st creature you play must have the “Paddle” attack. This includes the following creatures:
- Alpharoar
- Booster
- Jackopy
- Jarjomp
- Zoggy
- Gumpus
- Bark
- Koobie
- Duwilly
- Kabushi
- Spirelli
The second creature you can play can be any, you just need to make sure they’re placed on the same line as your 1st creature. When the minigame portion starts, the Paddle minigame will be a little bit harder since there’s an additional creature attacking. Complete the minigame without missing any buttons and the trophy will unlock.
Flawlessly complete a difficult “Slots” attack minigame! |
Missable.
While this is missable, it’s highly unlikely you’ll actually miss it as you’ll be using all of the different attacks throughout the game. When you’re in a battle, you’ll need to use two creature for this trophy. The 1st creature you play must have the “Slots” attack. This includes the following creatures:
- Eggins
- Chamble
- Flapjack
- Boln
- Rhododondo
- Woogle
- Shellican
- Oowoo
- Tumby
- Tokalotl
- Kamemelon
- Gonk
- Cahoots
The second creature you can play can be any, you just need to make sure they’re placed on the same line as your 1st creature. When the minigame portion starts, the Slots minigame will be a little bit harder since there’s an additional creature attacking. Complete the minigame without missing any buttons and the trophy will unlock.
Flawlessly complete 50 attack minigames! |
Missable.
while this trophy is missable, it’s very unlikely you’ll actually miss it since the minigames aren’t too terribly difficult. With 60 creatures each requiring multiple minigames to defeat, you’ll have plenty of opportunities to get this. The minigames are the “attack” games you’ll play once you’ve placed all of your creatures/colors. To flawlessly complete them, you can’t miss any notes/get hit. Depending on how well you do, this should unlock towards the end of Dinoland/near the beginning of Frightfrost.
Recolor five colors in one blow! |
Missable.
While this is missable, it’s very unlikely that you’ll actually miss it (it’ll unlock naturally). You’ll want to make sure you’re increasing the friendship level of your creatures to make this easier, but it’s basically just as the description says. In one single move, you need to recolor in 5 unique colors on a creature. In Dinoland, Vruu and Drecko will be good for this, but the creatures in the later game will have a plethora of colors that you need to fill in, making this trophy a lot easier. Be sure to keep an eye out for the passives your creatures have since some of them add a random color to the attack which can only help you. Again, there’s a good chance this will unlock naturally, but you need to make sure you get it before you collect the final/80th creature. If you have no more to collect, there will be nothing left to fight and you’ll need to start a new game to get this.
Collect 10 Thoughts. |
See ![]() Many Thoughts, Head Empty.
Many Thoughts, Head Empty.
Collect 25 Thoughts. |
See ![]() Many Thoughts, Head Empty.
Many Thoughts, Head Empty.
Collect 50 Thoughts. |
See ![]() Many Thoughts, Head Empty.
Many Thoughts, Head Empty.
Collect 75 Thoughts. |
In total, there are 80 Thoughts in the game. You only need 75 for this trophy but will need all 80 for ![]() Bulletin Board Service. These can be picked up as you go or you can clean them up after you finish the game (freeplay), though it’s recommended you pick up as many as you can on the go since the Thought Upgrades can help with Fishing and Combat. The locations of all 80 are as follows:
Bulletin Board Service. These can be picked up as you go or you can clean them up after you finish the game (freeplay), though it’s recommended you pick up as many as you can on the go since the Thought Upgrades can help with Fishing and Combat. The locations of all 80 are as follows:
- Island 3: Next to Eggins
- Island 4: Around the backside (hidden area)
- Island 4: Requires Balloon (learned when you reach Frightfrost
- Island 5: On the left side of the 2nd “layer”
- Island 7: On the left side (jump up the round platforms)
- Island 8: Inside the Skull by the Pier
- Island 8: Inside the cave (with Drecko)
- Island 7: By the fishing pier, jump across the platforms on the Northeast side
- Island 7: 3 Thoughts are earned through Disco Broccoli (see Dino Dino Revolution)
- Island 7: Right of the fishing pier
- Island 9: Bottom right
- Island 9: Around the left ledge after the puzzle with the 4 tall flowers (on the upper level)
- Island 7: Inside the cave, bottom left (near impossible to miss)
- Island 7: Just outside of the 2nd cave exit
- Island 10: In plain view
- Island 11: Under a haystack
- Island 12: In plain view
- Island 13: In plain view
- Island 14: In plain view
- Island 14: Right side, requires the Glider (learned after you reach the Sanctum of Self)
- Island 15 (Bones): In plain view
- Island 17: In plain view
- Island 18: On the high ledge
- Island 19: In plain view
- Island 20: Bottom right of the area
- Island 21: In plain view
- Island 22 (ice wall): Follow the wall as it goes left
- Island 23: Far right side, behind the high ledge, you need to create a red platform to reach it
- Island 25: In plain view
The following creatures will reward you a Thought when you win against them:
- Drecko (Island 8)
- Bubboar (Island 7)
- Mipsy (Island 11)
- Bippo (Island 14)
- Fripps (Island 16)
- Twax (Island 18)
- Jackopy (Island 20)
- Jarjomp (Island 23)
- Triggor (Island 24 – Requires Calypso being defeated for the gas tank extension)
FrightFrost
- Island 1: On top of the tall spire
- Island 4: Behind the “steps” (Hidden area)
- Island 4: On the Ice Wall (Requires Glide – learned in Sanctum of Self)
- Island 5: Inside the pipe next to the pier (getting this one will get you Your Plumber is in Another Game)
- Island 6: Left side
- Island 6: In the area where you need to make the 4x snowball, it’s inside one of the holes in the ground
- Island 6: Right of Whabam, climb up the floating glaciers
- Island 7: In the tree above Dippy
- Island 8 (Glaciers): In plain view
- Island 9 (Shop): On the left side
The following creatures will reward you a Thought when you win against them:
- Pimboh (Island 6)
- Dippy (Island 7)
Sunken Harbor
- Island 1: Follow the graveyard left and up the ledges
- Island 2: Inside the Club, tucked in the back left corner of the stage
- Island 2: In the shop area (the first door on the left side of the stage – island is shown on the right side of the map unnumbered)
- Island 3: Inside the room where you get the Drumstick
- Island 3: Ride the boat in the water in the middle of the area to find this one
- Island 4: Climb up the “plants” above the ship
- Island 4: Inside the room where you get the “toot toot” (on the right side of the Trumpet)
- Island 5: Hidden path down the masts
- Island 6: Right of the entrance to the room you get the Guitar
- Island 1: After beating Calypso, it’s inside the building on a high ledge on the left – requires the balloon to reach
The following creatures will reward you a Thought when you win against them:
- Woogle (Island 1 after you get the Glider)
- Skulliwag (Island 3)
- Rhododondo (Island 4)
- Shellican (Island 5)
Sanctum of Self

- Island 2: From where you have to glide up from the broken bridge, this is on a small round platform just before you reach the mainland
- Island 3: In the right window at the entrance of the building (getting this one will also earn you Window Shopping)
- Island 3: To the right of the building, follow the air streams around to the back. It’s on the right side of the room that Flokka is in.
- Island 3: Along the outside perimeter wall of the area (jump to the outer wall and walk along it)
- Island 5: In the room with the 3rd Puzzle, on the far left wall
- Island 5: In the same room as the previous Thought, jump towards the screen onto some small round islands to find this. They’ll be just around where you go up against Klunkey.
- Island 5: Use the boat to sail around the backside of the Island to find this tucked in a bone
- Island “6”: Between Islands 3 and 6, it’s on the bottom of the right column where the air stream is
- Island 6: Just right of Cahoots in the 2nd puzzle room
- Island 6: In the room just after the previous Thought, it’ll be above the door leading to the room on the right
- Island 6: Use the boat to sail around the far side of the island and it’ll be tucked away in the back
- Island 6: Follow the air streams on the right side of the Pyramid down to the tall statue.
- Island 8: In plain view
The following creatures will reward you a Thought when you win against them:
- Bunglebee (Between Islands 1 and 2 on the path where you have to Glide)
- Tumby (Island 3 – Outside the 2nd room exit when you’re climbing up the building)
- Gonk (Island 3 – Outside the 3rd room exit when you’re climbing up the building)
- Kabushi (Island 4)
- Klunkey (Island 5, 3rd puzzle room)
- Mosslow (Island 6, talk to him again once he’s moved out of the way)
- Duwilly (Island 6, after asking Mosslow to move, they’re up on the right)
- Cahoots (Island 6, 2nd puzzle room, bottom right island)
- Riki-Biki (Island 6, in the room where you have to move the snowball along the zig-zag platform)
- Bombous (Island 3, after defeating Shadow Billy and are on top of the Pyramid, you can find him on the backside)
- Solero or Lunaris (Island 3: Left side of the Pyramid, then the right side of the Pyramid)
Convert a Thought into a Figment of Imagination! |
See ![]() Bulletin Board Service.
Bulletin Board Service.
Collect ALL Thought Upgrades! |
Glitched.
The trophy itself isn’t technically glitched, but there is a glitch within the game that can prevent you from getting it. After you complete the first trial in the Sanctum of Self, you’ll need to travel Southwest to the second Trial’s island. You must take the path immediately South and land on the island just before the Trial island (if you’re looking at the maps provided under ![]() Many Thoughts, Head Empty. or
Many Thoughts, Head Empty. or ![]() Bestest Friend, you need to land on Island 4 before reaching Island 5). Kabushi is on Island 4 and is an encounter that you shouldn’t be able to miss. When you defeat him, he’ll reward you a Thought. If you go around this island and straight to the Trial Island (Island 5), Kabushi will be added to your creature repetoire after defeating Klunkey, but the Thought he gives you will not be rewarded. You need ALL the Thoughts to get all of the Upgrades in the game so if you miss that fight, you won’t be able to get this trophy. There is a patch in the works to fix this and ensure that you cannot miss the fight period.
Bestest Friend, you need to land on Island 4 before reaching Island 5). Kabushi is on Island 4 and is an encounter that you shouldn’t be able to miss. When you defeat him, he’ll reward you a Thought. If you go around this island and straight to the Trial Island (Island 5), Kabushi will be added to your creature repetoire after defeating Klunkey, but the Thought he gives you will not be rewarded. You need ALL the Thoughts to get all of the Upgrades in the game so if you miss that fight, you won’t be able to get this trophy. There is a patch in the works to fix this and ensure that you cannot miss the fight period.
You’ll need all 80 Thoughts for this trophy (their locations are listed under ![]() Many Thoughts, Head Empty). While on your boat, hit Circle to go inside and on the left will be the Thought processing machine. If you have enough Thoughts for the next upgrade, no numbers will be showing on the screen. If you don’t have enough, the number that appears will tell you how many more you need to find before you can get the upgrade. The upgrades will unlock in a “tier” sort of way. If you need 26 to unlock and upgrade and turn in the 26, your inventory count won’t start over. So if the next upgrade unlocks at 30, you’ll only need to pick up 4 more Thoughts. There are a total of 24 upgrades to get, all of which are listed below:
Many Thoughts, Head Empty). While on your boat, hit Circle to go inside and on the left will be the Thought processing machine. If you have enough Thoughts for the next upgrade, no numbers will be showing on the screen. If you don’t have enough, the number that appears will tell you how many more you need to find before you can get the upgrade. The upgrades will unlock in a “tier” sort of way. If you need 26 to unlock and upgrade and turn in the 26, your inventory count won’t start over. So if the next upgrade unlocks at 30, you’ll only need to pick up 4 more Thoughts. There are a total of 24 upgrades to get, all of which are listed below:
Upgrades
- 1 Thought: +1 Fishing Inventory Space
- 2 Thoughts: New Photo Filter
- 4 Thoughts: +1 Token Per Hand
- 7 Thoughts: New Photo Filter
- 10 Thoughts: +1 Token Per Hand
- 14 Thoughts: +1 Fishing Inventory Space
- 18 Thoughts: Boat Cosmetic
- 22 Thoughts: New Photo Filter
- 26 Thoughts: +1 Token Per Hand
- 30 Thoughts: Boat Cosmetic
- 34 Thoughts: New Photo Filter
- 38 Thoughts: +1 Token Per Hand
- 42 Thoughts: Boat Cosmetic
- 46 Thoughts: +1 Token Per Hand
- 50 Thoughts: New Photo Filter
- 54 Thoughts: Boat Cosmetic
- 58 Thoughts: +1 Token Per Hand
- 62 Thoughts: New Photo Filter
- 66 Thoughts: Boat Cosmetic
- 72 Thoughts: New Photo Filter
- 76 Thoughts: Boat Cosmetic
- 80 Thoughts: New Photo Filter
- 85 Thoughts: Boat Cosmetic
- 90 Thoughts: Boat Cosmetic
Befriend all creatures. |
There are a total of 80 Creatures that you’ll need to “collect” (collecting them makes them your friend). You can get these before or after you complete the story since Freeplay is available post-game. Since you’ll need to raise the friendship level of all the creatures to level 3 for ![]() Bestest Friend, please see that trophy for a breakdown of their locations.
Bestest Friend, please see that trophy for a breakdown of their locations.
Destroy 25 Objects! |
There’s a pretty good chance this will unlock naturally as you progress through the game, especially if you’re breaking barrels and the Fortune Cookies as you come across them. The majority of the barrels will be in Dinoland. Even if you don’t get them all in that area, there are plenty to smash throughout the game, so just be adamant about destroying them until you hit 25 and the trophy unlocks. The story related barrels will also count towards this trophy, so you’ll need to actively look for even less with those.
Peek through the window… |
You’ll earn this in Sanctum of Self. After you make your way to the pyramid the first time, you’ll soon after go East to an island that has a tall building on it. On the ground floor of the building will be a beam of light going into the left window, a doorway in the middle, and a window on the right. Jump into the window on the right to find a secret room and the trophy will unlock. There will also be a Thought in here that you’ll need for ![]() Many Thoughts, Head Empty and
Many Thoughts, Head Empty and ![]() Bulletin Board Service.
Bulletin Board Service.

Discover the broken warp pipe. |
You’ll earn this in Frightfrost. When you actually reach the open area (after the short tunnel you had to zigzag through), make your way to the 2nd story-related island and just by the pier will be a pipe in some snow.

Jump inside the pipe to unlock the trophy. There is also a Thought inside the pipe that you need to collect for ![]() Many Thoughts, Head Empty and
Many Thoughts, Head Empty and ![]() Bulletin Board Service.
Bulletin Board Service.
Climb to the highest point in each area of the World. |
You will get this automatically as you go for ![]() Many Thoughts, Head Empty. The highest point in Dinoland and the Sanctum of Self will be story related, but the locations in Frightfrost and Sunken Harbor will be found when you reach 2 specific Thoughts, so as long as you get all of those, you’ll get this trophy.
Many Thoughts, Head Empty. The highest point in Dinoland and the Sanctum of Self will be story related, but the locations in Frightfrost and Sunken Harbor will be found when you reach 2 specific Thoughts, so as long as you get all of those, you’ll get this trophy.
Break the Curse of the Leviathan and save the World. |
Story Related.
This trophy will unlock after you’ve defeated the Leviathan and AFTER the credits have rolled.
The Leviathan will have 3 separate symbol bars that he’ll rotate between. You need to take out all 3 while also taking out the claws that he summons. The claws will individually hit you if you don’t take them out and will also disable a random card in your deck. Try to make sure you’re using you “regain morale” cards as often as possible to keep yourself healed up. The fight isn’t difficult, it’s just long. Each time you take out one of his symbols bars, he’ll move around the island. You just need to use platforms to climb up to him and jump into him to start the next section of the fight. During the final phase of the fight, you’ll summon all of your creatures to attack and take him down in one glorious blow. The trophy will unlock after the cutscene.
Talk to all Kickstarter Backers characters! |
You’ll get this trophy in Frightfrost, but more specifically, Sunken Harbor. They are all located in the Bar/Club (look along the walls/in the booths), but won’t all be available until after you’ve returned the instruments to the musicians. Their names and locations are as follows:
- Bosun Kantun (available when you first enter the club)
- Mieb (available when you first enter the club)
- Xile (available when you first enter the club)
- Vitas Varnas (available after the Drummer area)
- Ingalls (available after the Trumpeter area)
- Mornard (available after the Guitarist area)
- DJ Archangel (available after the Guitarist area)
- Jason Dart (available after the Guitarist area – he’s the only one that will be upstairs)
Hear each and every one of the The Confessor’s secrets. |
While this trophy isn’t missable, you can make it a lot harder on yourself if you buy too many fish from the Vendors before getting it. For that reason, it’s highly recommended you wait to purchase any fish until after you’ve earned this trophy.
In Sanctum of Self, the first trial you do will take you to an island to the East that has a large building on it (this is the same building needed for Window Shopping). Make your way through the puzzles and after the 1st puzzle on the 1st floor, you’ll float up to a wall with some precarious looking eyeballs (this will be just to the right of the door leading to the 2nd puzzle).

When you talk to the strange man, he’ll offer you a secret regarding one of the 80 creatures available in the game for the low low price of 5 Coins. He has a secret to tell for all 80 creatures so you’ll need to speak with him another 79 times (and pay 5 coins each time) to get them all. In total, this trophy will cost you 400 coins. If you’re short, look for fishing spots and barrels since those will almost always include coins. Once you’ve listed to all 80 secrets, the trophy will unlock.
Discover Disco Broccoli! |
You’ll get this in Dinoland, but will need the shovel ability before you can get it. When you reach the large island at the top of the map (where you have to place the Idols of Power), follow the beach from the pier and you’ll eventually see 5 shapes on the ground:

This will be your puzzle solution. Keep heading right and use the red bounce flower to get up to the higher ledge. Keep going right, around the small lake, and on the Eastern side of the island will be some platforms you can jump to. The last of these platforms has 5 dirt piles on it that each have a shape on top. You need to “dig” (interact with) each pile until they match the pattern you saw on the beach earlier. When done correctly, a new cave area will open up just to the right of where the red bounce flower is/was. Head inside the cave to find Disco Broccoli. Talk with him to unlock the trophy.
He has 6 dance sequences you’ll need to complete for prizes, a few Thoughts being some of these which are needed for ![]() Many Thoughts, Head Empty and
Many Thoughts, Head Empty and ![]() Bulletin Board Service. There are 3 Thoughts to collect from Disco Broccoli.
Bulletin Board Service. There are 3 Thoughts to collect from Disco Broccoli.
Unrelated note: If you don’t already have That’s Pretty Deep, you can just keep interacting with the dirt piles that have the shapes on them. Each interaction counts as one “dig” and since they don’t disappear, you can just “grind” out all 15 “treasures” here.
Glide using the Billy-Copter for more than 5 straight seconds! |
There’s a really, really good chance you’ll get this naturally. You’ll learn to glide when you reach Sanctum of Self and will have ample opportunities to get this. If you don’t want to just jump off a cliff for it, you can just idle in an air stream to get it.
Get reprimanded for punching barrel-kind. |
You’ll earn this in Sanctum of Self. After you activate the first yellow beam, you’ll make your way down to a small island with a Mausoleum on it (this will be Southwest from the central Pyramid). When you get to the island, look left of the pier and just behind some tree vines is a single, lone barrel. Give the barrel a good whack and you’ll learn that it’s not quite a normal barrel. After the dialogue is done, the trophy will unlock.
Fast travel between two distant areas of the World. |
When you open up your Map, you’ll be able to fast travel to any location that you’ve already cleared/colored back in. For this trophy, you just need to fast travel from one island to another one that’s “far” away. It needs to be about the length of half the map for the trophy, but it can be a bit on the finicky side. Just to be safe, fast travel to the first island so you’re on the pier with the bell, then fast travel to your chosen “far off” destination. This will ensure both islands are registered properly for the trophy to unlock.
Listen to Friend-Ship whistle for more than 5 straight seconds. |
There’s a pretty good chance you’ll get this naturally and very early on in the game. When your boat, Friend-Ship, is in “colored” waters, he’ll be happily whistling along. Just stand close enough to him so he’s in view on your screen and after 5 seconds, the trophy will unlock.
Catch 10 non-gummi items while fishing. |
Unless you’re planning on levelling up all of the creatures to Level 3 using only Fish Gummies, you’ll get this as you go for ![]() Bestest Friend. Most of the gifts you collect will be earned through Fishing and there are more than 10 different gifts available, giving you more than enough items to get this trophy. Some of the gifts are in closed boxes underwater that you need to remove a lid to get. This lid counts as one of the non-gummi items, so really you’ll only need to fish up 9 different gifts for this trophy.
Bestest Friend. Most of the gifts you collect will be earned through Fishing and there are more than 10 different gifts available, giving you more than enough items to get this trophy. Some of the gifts are in closed boxes underwater that you need to remove a lid to get. This lid counts as one of the non-gummi items, so really you’ll only need to fish up 9 different gifts for this trophy.
Catch at least one of each kind of fish! |
There are a total of 33 different kinds of fish you can catch in the game. They’re all show in your journal and each color variant will count as one unique “type”. You should absolutely be fishing at any spot you come across to make levelling the friendship of your characters easier, but if you’re missing any specific one, just look for the fish jumping out of the water at each fishing location. The fish jumping out will tell you what color and type are in that particular fishing spot. Your minimap also has a fish icon on it to point you in the direction of any nearby fishing spots. Once you’ve caught at least one of all 33 types, the trophy will unlock. If you’re having trouble finding any type, you can also just buy them from the vendor. You may need to bounce around to find the one that sells the fish you need, but purchasing them does count towards the trophy.
Catch three different objects in one fishing session! |
You’ll need to upgrade your Fishing Slots through converting Thoughts before you can get this one (you just need one upgrade which you get by turning in 1 Thought – see ![]() Bulletin Board Service for more info). When you have enough slots, you’ll need to find a fishing spot that either offers 1-2 gifts, or has at least 3 types of fish. When you’ve found a spot, be careful not to hit any of the underwater spikes and pick up their 3 different items. When you exit out of the fishing minigame, the trophy will unlock.
Bulletin Board Service for more info). When you have enough slots, you’ll need to find a fishing spot that either offers 1-2 gifts, or has at least 3 types of fish. When you’ve found a spot, be careful not to hit any of the underwater spikes and pick up their 3 different items. When you exit out of the fishing minigame, the trophy will unlock.
Dig up 15 buried treasures. |
You should be digging up all of the dirt piles you come to throughout the game so you can collect Gifts for your creatures, so as long as you’re doing that, this trophy will unlock naturally.
Alternatively, there is a way to sort of cheese it. When you reach the main island in DInoland, you’ll be able to reach Disco Broccoli (see Dino Dino Revolution). There is a point when opening up the cave he is in where you need to interact with 5 dirt piles to change the shapes on them. Each interaction with one of these dirt piles counts as you “digging up” treasure, even though you’re not actually digging up anything. Just interact with any of these 15 times (or however many times you need to in order to reach 15) and the trophy will unlock.
Own 500 coins or more at one time |
While this trophy isn’t technically missable, you can end up making it more difficult on yourself if you go spend thrifting early on in the game. You want to try to not spend any coins until you reach 500. You’ll get these through Fishing, opening Chests, breaking Barrels, digging up Dirt Piles, and of course just picking them up out in the open. It won’t take too long to get to 500 so long as you’re being adamant about your fishing spots, but if you reach a vendor before hitting 500, just try your best not to buy anything and come back to them later after the trophy has unlocked.
If you went spend thrifting and reach the end of the game without getting this trophy, you’ll need to grind out fishing spots to get what you’re missing. It’ll be a bit time consuming, but it’s better than having you be blocked out of the trophy completely. As soon as you reach 500 coins in your inventory, the trophy will unlock.