
Trophy Roadmap
Difficulty: 3/10
Estimated time to Platinum: 25 – 35 hours
Trophies: 32. ![]() 1 /
1 / ![]() 5 /
5 / ![]() 13 /
13 / ![]() 13
13
Missable trophies: 10 – Consummate Cross-dresser, Shuriken Join Us, Won’t You Be My Valentine?, Meet Your Maker, Inner Demons, Best Bromance, Waiting in the Wings, See the Light, Bahamutype-0, Loose Cannon
Glitched trophies: None
Difficulty related: None
Playthrough: 1 – 2
Introduction
Welcome to the Final Fantasy VII trophy walkthrough!
Final Fantasy VII is a 1997 role-playing video game developed by Square for the PlayStation console. It is the seventh main instalment in the Final Fantasy series. Published in Japan by Square, it was released in other regions by Sony Computer Entertainment and became the first in the main series to see a PAL release. The game’s story follows Cloud Strife, a mercenary who joins an eco-terrorist organization to stop a world-controlling megacorporation from using the planet’s life essence as an energy source. Events send Cloud and his allies in pursuit of Sephiroth, a superhuman who seeks to wound the planet and harness its healing power in order to be reborn as a demigod. During the journey, Cloud builds close friendships with his party members, including Aerith Gainsborough, who holds the secret to saving their world.
Development began in 1994, originally for the Super Nintendo Entertainment System. After delays and technical difficulties from experimenting on several platforms, Square moved production to the PlayStation, largely due to the advantages of the CD-ROM format. Veteran Final Fantasy staff returned, including series creator and producer Hironobu Sakaguchi, director Yoshinori Kitase, and composer Nobuo Uematsu. The title became the first in the series to use full motion video and 3D computer graphics, which featured 3D character models superimposed over 2D pre-rendered backgrounds. Although the gameplay systems remained mostly unchanged from previous entries, Final Fantasy VII introduced more widespread science fiction elements and a more realistic presentation. The game had a staff of over 100, with a combined development and marketing budget of around US$80 million.
In previous versions, the time to completion would be about 45-75 hours. The save file to prove that would be found here with the download being submitted by JagDogger2525 for the original PlayStation version.
Limit Breaks:
To quickly get Limit Breaks, the best place would be on the Corel Train Tracks. There will be more five enemies and using Choco/Mog Summon will take out all enemies in one shot per character. The three line up will require an extra kill but that should be easy with the Ice Materia.
New Additions:
(L3) multiplies game speed by three. Menus and cutscenes are unaffected. Holding down the confirm button in battle to continuously select commands will not work while active.
(R3) restores party members to max HP, MP and fills their LIMIT gauge but does not prevent death from more than the HP will allow.
(L3) + (R3) together toggle random encounters on/off.
From FinalFantasy.Fandom.com
Roadmap
Step 1: Part 1
As a caution, please take a look at “Best Bromance” to not have to play through the game over again
![]() First Blood [15G]
First Blood [15G]![]() Breaking New Ground [15G]
Breaking New Ground [15G]
This is an easy trophy from winning the very first battle. Activate (R3) [pushing in the right stick like a button], use two Limit Breaks on both enemies and both of these will unlock.
![]() Failure IS an Option [15G]
Failure IS an Option [15G]
Play the game until you get to a save point, save the game, deactivate (R3), get into a battle, activate (L3), and wait. You’ll get it once you lose a battle and won’t have to start the game from the long cutscene at the beginning.
![]() Consummate Cross-dresser [15G]
Consummate Cross-dresser [15G]
When you get to Wall Market, make sure you have at least 280 Gil. From the start, you’ll need to go to the right (or up and over) to the Honeybee Inn (HBI) and speak to the guy on the left and then the grey haired guy who is not moving in front of the well dressed person. When the dialogue goes on, choose the “You know a girl named Tifa?” option for both. From there, go all the way north until you come across a guy blocking what looks like the entrance to a mansion of some sorts. There will be some dialogue with him. After that, you should be able to get the proper arrangement for Cloud to be picked at Don Corneo’s mansion.
Go to the Diner which should be above the Pharmacy / Item Shop and about in line with the save point. Get some food for 70 Gil. Choose “It was alright” to receive a Pharmacy Coupon. Go to the pharmacy and talk to the clerk. When offered a selection, choose “Digestive” as it will give the best version of Cologne. There is a “Clothes” store on the left before going to the next area. Go in there and speak to the clerk. They will say that their father is getting soused at the bar (in which the “Digestive” will come into play). One area up, the first door on the left will be the bar/restaurant. Talk to the soused father sitting on the bar stool. After some conversing, some selections will be made. The selections would be “that feels soft” and then something “that shimmers” as that will net you the “Silk Dress” from the father when at the “Clothes Store” again. Before leaving, go up to the bathroom (the door above where the patron is doing the pee-pee dance), and give the person in the bathroom the “Digestive”. You will receive “Sexy Cologne”.
Okay, from there, go back to the “Clothes Store” one screen down and you’ll try the dress on. Since the ensamble isn’t complete, what will be suggested is going to the Gym (across from the Bar one screen up). Save the game. Go to the Gym and beat the body builder (BB) in squats. If you don’t beat the BB in squats, your hard work won’t be all for naught. Reload and try again. You’ll receive a “Blonde Wig” for winning (“Wig” for losing and “Dyed Wig” for a tie).
For more incentive to get the unlock, go back down to the main area, travel over to the save point (save if you wish) and then staying on the right, go all the way up to the top door. This is the Materia Shop. The clerk would want you to get an item from the Inn. Make sure you have 210 Gil. Go to the Inn, stay there, you’ll be in front of the vending machine. Get the most expensive item. Go back to the clerk and hand over the item. You’ll receive a “Diamond Tiara” for your troubles (best 210 Gil spent, right?). After that, talk to the guy in the white shirt before the HBI in the southern right corner of the main area. You’ll get a “Member’s Card” for one more incentive. Go to the right (which would be the HBI), talk to the sharp dressed man to gain access. It technically doesn’t matter for the northwest or southwest (top-left // bottom-left) rooms as the next will help increase chances. Northwest will yield “Lingerie” whereas southwest get “Bikini Bottoms” but be quick to talk to the Honeybee to get the item before they leave the room. After, go through the north most door and have the Honeybees make you all pretty (put makeup on Cloud’s face – man, I hope I look pretty).
Finally, once that is ALL done, save the game and go up north back to the mansion and speak with the doorman. You and [Aerith/Aeris] {Aeri[x] from here on out} will be escorted inside. Once the dialogue is finished, go up the stairs through the left most door. Fall down the steps, have a dialogue with Tifa, go back upstairs, and through the middle doors. Some suspense but Cloud will be chosen. The dialogue choices will be if there is someone else, choose “Umm…”, and who the other person is, choose “Yes, his name’s Barret…” (as this will DRASTICALLY help you secure “Best Bromance” to be acquired).
The videos below will show the steps BUT they do not show the going to the HBI to make sure to activate BEFORE the first visit to the mansion.
![]() Fledgling Summoner [15G]
Fledgling Summoner [15G]
When you leave Midgar, you’ll be able to have [pseudo] free roam of Gaia (name of the planet within Final Fantasy VII). You’ll have three places to go to. Kalm, which is the closest town to Midgar, Chocobo Ranch, a bit further on the map, and Mythril Mines, which is to continue the story AFTER the Kalm story. Go to the Chocobo Ranch, talk to the Chocobos (giant yellow ostrich looking birds). Select the first “Wark” choice and you will get the Choco/Mog Summon Materia. Place the Materia on one of the characters, get into battle, and use the Choco/Mog Summon (Summon > Choco/Mog).
If you want to make it easier to get to the Ranch, activate (L3)+(R3) to not get any battles and deactivate to get into a battle.
![]() Shuriken Join Us [15G]
Shuriken Join Us [15G]
To get Yuffie on your team, go to any forest outside of the Mythril Mines (the first cave you come to and after Zolom), get into a fight, defeat Yuffie and there will be a dialogue. Do NOT save or go into the menu as Yuffie will pilfer some money from you and leave. If you do not get her on the first try, do NOT reattempt until AFTER the Gold Saucer Date for “Best Bromance” or else you might end up messing up the work for Barret. The answers to get Yuffie would be: Not interested // Petrified… // Wait a second! // That’s right. // Let’s hurry.
![]() Wheel of Fortune [35G]
Wheel of Fortune [35G]
This should be easy as it just requires you to use Cait Sith to defeat 40 enemies and will unlock with the Slots Limit Break
![]() Chocochampion [15G]
Chocochampion [15G]
This will unlock when you get into Corel Prison under Gold Saucer, make amends with Barret’s long time best friend, and get pardoned by winning a Chocobo Race. Chances are you won’t win the first time around but try again do NOT forget to pick up the Rumah Summon in this area.
![]() Best Bromance [15G]
Best Bromance [15G]
Follow EXACTLY the steps below in order to get Barret to date you:
In Midgar:
1. Buy a flower from Aeri[x].
2. Say to Jessie that you’re “Looking forward to it” after she tells you about the train.
3. Give the flower to Marlene.
4. Avoid talking to Tifa in the bar. When she tells you that you left your childhood friend alone, answer “…Sorry”. The following morning, speak to her and answer “Barret’s snoring kept me up…”.
5. Don’t get caught by the security lockdown, and get to the end of the train.
6. After the battle against Air Buster, before Cloud’s fall, answer “Be strong” to Barret.
7. When Aeri[x] is fleeing from the guards, always ask her to wait and push the wrong barrel each time.
8. When Aeri[x] asks you if Tifa is your girlfriend, answer “Yeah, that’s right”.
9. When you’re in the playground with Aeri[x], say that you will “Take her home”.
10. Makes sure that Cloud gets chosen for Don Corneo’s date. When asked if there’s someone else, answer yes, and say it’s Barret.
11. In the sewers, talk to Aeri[x] first.
12. Marlene asks how you feel about Aeri[x], answer “I don’t know”.
13. When you meet Red XIII, asks Barret to take care of Aeri[x]. After the battle, form a party consisting of Cloud, Red XII and Barret.
14. When Tifa asks you if you can break out, answer “Kinda hard”.
15. When you’re asked to think about people, think about Barret first, then Red XIII, and finally Aeri[x].
16. When escaping Midgar, form a party consisting of Cloud, Barret and Red XIII.
In Kalm:
17. After the flashback, tell Barret to “Wait a sec”, and then choose “Beautiful, just beautiful!”.
18. Form a party consisting of Cloud, Barret and Red XIII. Find a woman who says that Mako energy is convenient, and tell her “You’re full of it”. Afterwards, find the little girl upstairs talking about old life, and tell her “Yeah, maybe”.
After Kalm:
19. In Fort Condor, agree twice with the old man.
20. Don’t go after Yuffie yet. Or if you do, make her join your team the first time around.
21. On the Cargo Ship, don’t give Yuffie a Tranquilizer. Talk to Aeri[x], and tell her “I dunno…” when she asks about the Airship. Talk to Tifa, and tell her “I don’t know” when she asks you about war.
22. At the Gold Saucer, talk to Red XIII first, and take him with you.
23. When going to see Dyne in Corel Prison, form a party consisting of Cloud, Barret and Red XIII.
24. Enter Gongaga with a party consisting of Cloud, Tifa and Aeri[x]. Meet with Zack’s parents, and then leave town without speaking to any of the two girls.
25. Do not go near Wutai, so that you don’t trigger the Wutai sidequest if Yuffie is in your party.
From Cave of Narshe
![]() A Universe of Pain [35G]
A Universe of Pain [35G]![]() Won’t You Be My Valentine? [15G]
Won’t You Be My Valentine? [15G]
There is a safe in Shinra Mansion that requires a combination to get the key to unlock the basement door where Vincent is behind and Cosmo Memory for Red XIII
Combination: (Right 36), (Left 10), (Right 59), (Right 97)
For Red XII’s Final Limit Break to be learned, you must have all 5 previously locked Limit Breaks unlocked.
| Limit Break Level | Limit Break Name | How to Unlock |
|---|---|---|
| Level 1 #2 | Lunatic High | Use Sled Fang 8 times |
| Level 2 #1 | Blood Fang | Defeat 72 enemies total |
| Level 2 #2 | Stardust Ray | Use Blood Fang 7 times |
| Level 3 #1 | Howling Moon | Defeat 144 enemies total |
| Level 3 #2 | Earth Rave | Use Howling Moon 6 times |
![]() See the Light [35G]
See the Light [35G]
HUGE NOTE!!: Before entering the Temple of Ancients, make sure to get Aeri[x]’s Final Limit Break Great Gospel. “See the Light” will be missable if you continue so please save in a separate spot.
You will need to have the Buggy. Before doing anything, make sure you have 110 Gil. Drive into Costa del Sol [CdS] (yes, you can do this ONLY for CdS and Junon), take the boat for 100 Gil to Junon. There is a cave located to the north on Junon across some shallows where a sleeping man lives. When you go in and the player has fought an odd number of battles of the last two numbers (or with zeros such as 11, 133, 1055, 200 [odd being 1, 3, 5, 7, 9]), the team will be given Mythril. If it is anything different you’ll either get nothing or a Bolt Ring, if the last two are even. Once you get the Mythril, cross back over via Junon for 10 Gil and go to the Gold Saucer area. Once there, there will be a house across a shallow. Talk to the Weapon Seller, change the subject, give the Mythril, and select the safe upstairs. It will be Great Gopel. Here are the five Limit Breaks to be unlocked for Aeri[x]:
| Limit Break Level | Limit Break Name | How to Unlock |
|---|---|---|
| Level 1 #2 | Seal Evil | Use Healing Wind 8 times |
| Level 2 #1 | Breath of the Earth | Defeat 80 enemies total |
| Level 2 #2 | Fury Brand | Use Breath of the Earth 7 times |
| Level 3 #1 | Planet Protector | Defeat 160 enemies total |
| Level 3 #2 | Pulse of Life | Use Planet Protector 6 times |
![]() Waiting in the Wings [15G]
Waiting in the Wings [15G]
When you get to the Black Materia area (Hieroglyphic Room), when you encounter the Red Dragon, the Bahamut materia will drop. Pick it up to get “Waiting in the Wings”.
Step 2: Part 2
![]() Loose Cannon [35G]
Loose Cannon [35G]
Barret’s Final Limit Break Catastrophe can be achieved from saving Corel from the impending train and acquiring the “Huge Materia”. There is a save point before going to the reactor so I HIGHLY suggest saving in case you fail. Here are Barret’s other five Limit Breaks:
| Limit Break Level | Limit Break Name | How to Unlock |
|---|---|---|
| Level 1 #2 | Mindblow | Use Big Shot 9 times |
| Level 2 #1 | Grenade Bomb | Defeat 80 enemies total |
| Level 2 #2 | Hammer Blow | Use Grenade Bomb 8 times |
| Level 3 #1 | Satellite Beam | Defeat 160 enemies total |
| Level 3 #2 | Angermax | Use Satellite Beam 6 times |
![]() Packing a Punch [35G]
Packing a Punch [35G]
Tifa’s Final Limit Break Final Heaven is obtainable from Tifa’s piano in Nibelheim after Cloud has returned to the party after his ‘incident’. The following two tables are once at the piano and Tifa’s five other Limit Breaks.
| Playstation | (X), ([]), (/\), (L1)+(/\), (L1)+([]), (X), ([]), (/\), (L1)+(X), (O), (X), ([]), (X) |
| Xbox | (A), (X), (Y), (LB)+(Y), (LB)+(X), (A), (X), (Y), (LB)+(A), (B), (A), (X), (A) |
| PC | X, B, V, H+V, H+B, X, B, V, H+X, C, X, B, X |
| Switch | (B), (Y), (X), (L)+(X), (L)+(Y), (B), (Y), (X), (L)+(B), (A), (B), (Y), (B) |
| Limit Break Level | Limit Break Name | How to Unlock |
|---|---|---|
| Level 1 #2 | Somersault | Use Beat Rush 9 times |
| Level 2 #1 | Waterkick | Defeat 96 enemies total |
| Level 2 #2 | Meteodrive | Use Waterkick 7 times |
| Level 3 #1 | Dolphin Blow | Defeat 192 enemies total |
| Level 3 #2 | Meteor Strike | Use Dolphin Blow 6 times |
![]() Bahamutype-0 [35G]
Bahamutype-0 [35G]
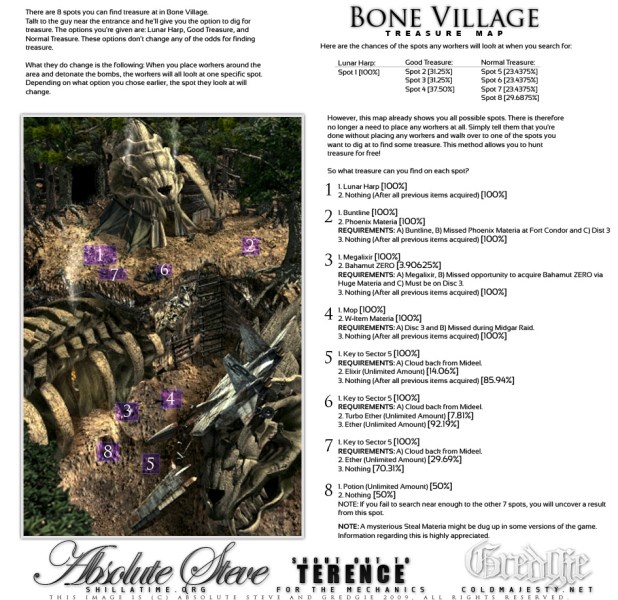
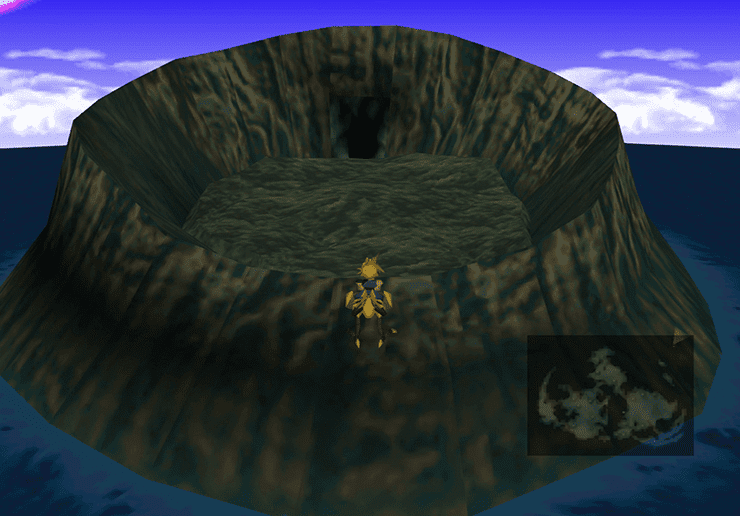
This is missable if Bahamut (Temple of Ancients) and Neo Bahamut (Whirlwind Maze) are not obtained. When going on the hunt the “Huge Materia” quest, if you have gathered all three of the others, the last would be in the Rocket Town Shinra No. 26 rocket. Once the “Huge Materia” is in your posession but before the Bugenhagen to Ancient Capital quest has been started, you’ll be able to get Bahamut Zero (BZ) from the blue “Huge Materia”. If you fail to get the “Huge Materia” but have the other two Bahamuts, Bone Village will have the BZ materia (spot shown below thanks to the Steam User of De Wolfe – Picture & Site). The code to get the “Huge Materia” would be the following:
| Playstation | (O), ([]), (X), (X) |
| Xbox | (B), (X), (A), (A) |
| PC | C, B, X, X |
| Switch | (A), (Y), (B), (B) |
![]() Gale Warning [35G]
Gale Warning [35G]
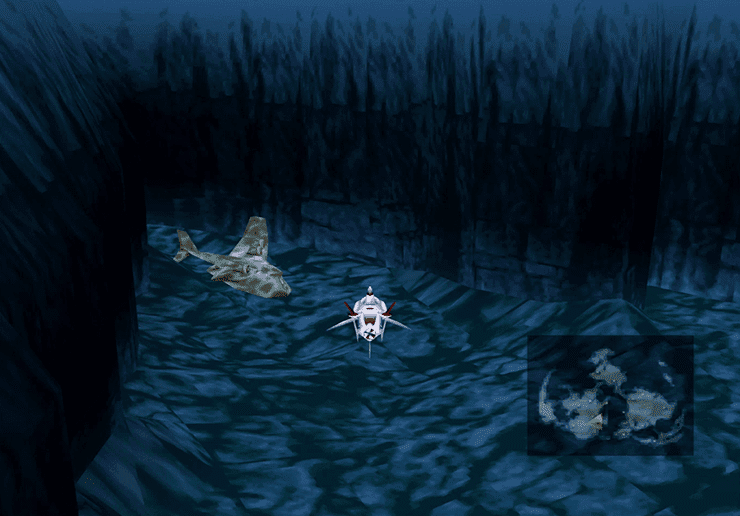
Cid’s Final Limit Break Highwind is found in the Sunken Gelnika only after acquiring the Sub from the “Huge Materia” Junon mission. Images from Jegged.com and Jegged.com. Here are the Limit Breaks for Cid and the location of the Gelnika:

| Limit Break Level | Limit Break Name | How to Unlock |
|---|---|---|
| Level 1 #2 | Dynamite | Use Boost Jump 7 times |
| Level 2 #1 | Hyper Jump | Defeat 60 enemies total |
| Level 2 #2 | Dragon | Use Hyper Jump 6 times |
| Level 3 #1 | Dragon Dive | Defeat 136 enemies total |
| Level 3 #2 | Big Brawl | Use Dragon Dive 5 times |
![]() Making Waves [15G]
Making Waves [15G]![]() Meet Your Maker [35G]
Meet Your Maker [35G]
Yuffie’s Final Limit Break All Creation can be obtained from defeating Godo within Wutai. To prepare, make sure you have all the Enemy Skill materia you have on Yuffie along with a Ribbon as it will help the process of getting the last opportunity of Trine and preventing any status changes when facing the padoga tower of challenges after the Wutai side quest. When Godo is defeated, Leviathan will be given for the double unlock. Here are the five locked Limit Breaks for Yuffie:
| Limit Break Level | Limit Break Name | How to Unlock |
|---|---|---|
| Level 1 #2 | Clear Tranquil | Use Greased Lightning 8 times |
| Level 2 #1 | Landscaper | Defeat 64 enemies total |
| Level 2 #2 | Bloodfest | Use Landscaper 7 times |
| Level 3 #1 | Gauntlet | Defeat 128 enemies total |
| Level 3 #2 | Doom of the Living | Use Gauntlet 6 times |
![]() Inner Demons [35G]
Inner Demons [35G]
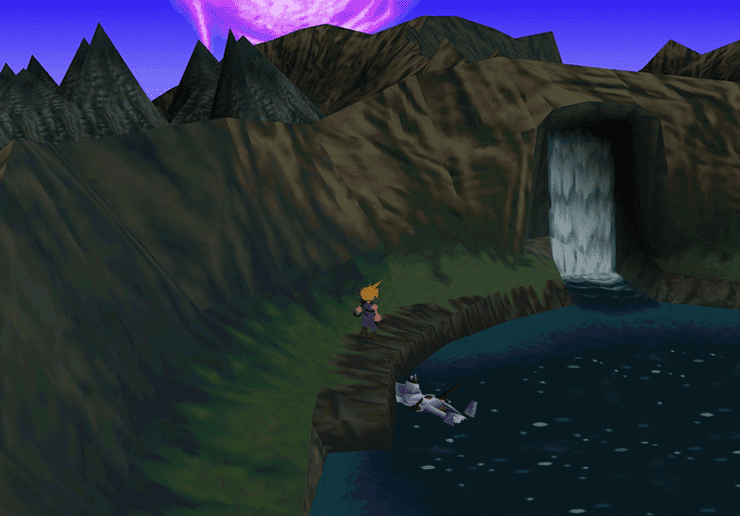
Vincent’s Final Limit Break Chaos can be acquired from Lucrecia’s Crystal Cave. You will need the submarine after the Junon “Huge Materia” quest or a Green Chocobo. The cave is located in the water subset between Golden Saucer / Corel and Nibelheim. Talk to Lucrecia and then fight about 10 battles and then return. Image from Jegged.com. It will be available in the back of the cave. Here are the other five of Vincent’s Limit Breaks:
| Limit Break Level | Limit Break Name | How to Unlock |
|---|---|---|
| Level 2 | Death Gigas | Defeat 40 enemies total |
| Level 3 | Hellmasker | Defeat 96 enemies total |
![]() Diamond Disintegrator [70G]
Diamond Disintegrator [70G]
After the “Huge Materia” and Bugenhagen to Ancient Capital quests, you’ll be prompted to go to Midgar as Diamond Weapon is headed towards to destroy Shinra (sort of good riddance but still have to fight). Whether or not you are using the (L3)/(R3) cheats, then the best option would be electric spells and Limit Breaks. Once Diamond Weapon is down and out, “Diamond Disintegrator” will unlock.
Step 3: Partial Cleanup within Part 3
![]() Corel’s Angel [15G]
Corel’s Angel [15G]
Make sure you have at least 4,000 Gil. Go to Gold Saucer, get the Golden Ticket, go Wonder Square, go into the back room and there should be an open bike game next to someone playing the game. Play the open game, and make sure you don’t loose as many point as possible (which is done by enemies hitting the truck) along with the x3 Game Speed is turned off. It may take a couple tries but as soon as you reach the end with over 10,050 points, you’re winner.
![]() The Slash to End All Slashes [35G]
The Slash to End All Slashes [35G]
With the Golden Ticket in tow, and still at Gold Saucer, and (hopefully) 50,000-70,000 additional Gil in pocket, enter and exit gold saucer until you see a guy at the house above the save point. Exchange 10,000 Gil for 100 GP for every time he is there and do it until you have about 500-700 GP as you’ll need it. Cloud’s Final Limit Break of Omnislash can be acquired from the Battle Arena within Gold Saucer for 51,200 BP (Battle Points) after the Tiny Bronco or 32,000 BP after the Highwind. It is best to equip the one you are using with a Ribbon as it will protect against ALL statuses the you will come across in the Battle Arena (except Armor Broken which I would personally back out as with Item Broken THEN either Frog or Mini would royally mess you up. At that point, no use continuing as all attacks will be 1 and will take FOREVER). There are two spots: Temple of the Ancients & Gaea’s Cliff. The Battle Arena will net a random amount depending on which slots were active during the battle. Play until you have enough to get Omnislash. But here are Clouds other five Limit Breaks:
| Limit Break Level | Limit Break Name | How to Unlock |
|---|---|---|
| Level 1 #2 | Cross-Slash | Use Braver 8 times |
| Level 2 #1 | Blade Beam | Defeat 120 enemies total |
| Level 2 #2 | Climhazzard | Use Blade Beam 7 times |
| Level 3 #1 | Meteorain | Defeat 320 enemies total |
| Level 3 #2 | Finishing Touch | Use Meteorain 6 times |
![]() Materia Mastermind [15G]
Materia Mastermind [15G]![]() Emerald Eviscerator [70G]
Emerald Eviscerator [70G]![]() Transcendant Convoker [70G]
Transcendant Convoker [70G]
The best would require the team of Cloud, Cid, and Cait Sith with Cloud and Cid having level 4 Limit Breaks and Cait Sith having his Level 1 (Dice) Limit Break. The way to accommodate Emerald would have to have Mastered HP Up Materia on each character (bought from Mideel) and would get “Materia Mastermind” if you upgraded before this fight. It is HIGHLY recommended to have at most two to three materia equipped as Emerald has an attack called “Aire Tam” which deals damage equal to the amount of materia each has on their weapon/armor (and Aire Tam is Materia spelt backwards). There are two ways to get rid of Emerald. The first, but most risky, is not getting Underwater Materia and having a time limit of 20 minutes (I would go this route ONLY if the three are high enough levels) or the second getting the Underwater Materia from morphing the Ghost Ship from under Junon into a Guide Book and trading it to the Kalm Traveler in the upstairs of the house furthest back on the bottom area of Kalm which eliminates the time limit. I would suggest saving before attempting but if you feel confident enough in the levels, then Underwater wouldn’t be needed but WILL be tight. My recent Emerald fight took 19 minutes and 15 seconds and was worried about the drowning factor so please be cautious of that.
Once Emerald is defeated, you’ll get an Earth Harp and if you had a piece of materia that needed upgrading that had five levels and isn’t upgraded, congratulations on “Materia Mastermind” as Emerald brings in a hefty 50,000 AP. A single piece of All Materia would trigger this. Trade the Earth Harp with the Kalm Traveler to get Master Command, Master Magic, and the main, Magic Summon. Use this for the next battle.
Side Note:
If you are feeling EXTREMELY lucky, you could use Cait Sith’s Slots and get the Cait Sith face for the non-existent win but it is also risky as the wrong slot for the last and it is game over for your whole team.
![]() Ruby Render [70G]
Ruby Render [70G]![]() Roundtable Destruction [35G]
Roundtable Destruction [35G]
To get Ruby Weapon to appear, you would first have to defeat Diamond Weapon (and from my most recent playthrough Ultimate Weapon) and this weapon will appear in the sands of Gold Saucer. Be prepared as this would be tough. I suggest using the same team as before (Cloud, Cid, Cait Sith). I would also suggest killing two of your characters, equipping the surviving with Phoenix, and one of the dead with W-Summon (64,000 BP from Battle Arena at Gold Saucer) and Master Summon. HP Up would work wonders here if your dudes don’t have at least 8,000 HP (even one if they are). I would also sort of side recommend getting the Mime Materia so that equip the two without the Master Summon with a Mime and Master Command to have a repeating double summon of Knights of the Round (Do NOT equip any Counter materia as that would break the chain). As soon as you save then enter battle, Ruby would bring the tentacles down into the sand. Use Phoenix to bring the other two alive and then just spam Knights of the Round about 7-8 times for the win. One of your characters might go down from Whirlsand but that shouldn’t deter the Mime Effect.
Once defeated, Desert Rose is awarded and once more, Kalm Traveler. You’ll get a Gold Chocobo. If you have the Rent-A-Stable at the Chocobo Farm, it would be there, otherwise, on the Highwind. Ride the Chocobo to the upper right most corner of the map and there should be an Island/Forest cave there with Knights of the Round.
Side Note:
If you are feeling EXTREMELY lucky, you could use Cait Sith’s Slots and get the Cait Sith face for the non-existent win but it is also risky as the wrong slot for the last and it is game over for your whole team.
Image from Jegged.com

![]() A Feat of Meteoric Proportions [70G]
A Feat of Meteoric Proportions [70G]
Within the Northern Crater, I would HIGHLY recommend following the guide from Jegged.com here to get more items than you would normally get and would use the Save Crystal in the pool/pond area to get save and get the final two unlocks. Once you get to the area of what would be considered the Point of No Return (which is when the party rejoins/regroups), go down with your 2 favorite characters, best eqiupment, Master Summon, Master Command, and Mime. Recommandations would reach to using Limit Breaks until you reach the villian. Just spam Knight of the Round to make everything easier and quicker.
Step 4: Final Cleanup
![]() Coming Up All Nines [35G]
Coming Up All Nines [35G]
This would unlock by having Cloud and Cid equip their Triple AP Weapons (Apocolypse and Scimitar, respectively), and having Mystile on all three characters along with having 22 All Materias within all AP Growth Slots but one slot where the last would accompany the Exp Up Materia (Details from “Liege of Leveling”). The slots that do NOT have AP Growth with indicate whether it is None, Normal, Double, or Triple. There are two enemies that yield a massive amount of AP and that would be Movers (2,400 AP per battle) and Magic Pots (1,000-2,000 AP per battle) where the Triple AP will help exponentially. Both are located in the pool/pond area of the Northern Crater. Before entering battle, make sure you have acquired the W-Item from the Ambush on Shinra / Assault at Midgar quest/mission as you will need it to perform the infamous W-Item Duplication Bug for pretty much infinite Elixers for the Magic Pots.
With the All Materia, they can be purchased at the Fort Condor Materia Shop and they have a Max/Master AP hold of 35,000 AP. You will need at most 72 Mastered All Materias which will yield 1.4M Gil each. This may take a while, but for that platinum, it sure works.
The first Mystile would be acquired from Midar and the second (and third, if done right) Mystile would be following the guide from Jegged.com here.
![]() Liege of Leveling [35G]
Liege of Leveling [35G]
This would be unlocked with a Mastered Exp Up Materia on your highest level character. Works best if working in conjunction with “Coming Up All Nines” as that would net some nice experience boosts while you farm the All Materia in the pool/pond area of the Northern Crater. The Exp Up would be acquired from Gold Saucer for 2,000 GP from the Wonder Square so make sure you have at least 200,000 Gil stashed (along with the Golden ticket and Apocolypse or Scimitar for that Triple AP Growth) for the enter/exit as mentioned for Cloud’s Omnislash.
Step 5: Congratulations
![]() Gaia’s Guardian
Gaia’s Guardian
You have completed Final Fantasy VII. Congratulations
If you liked this guide, you’ll find more on our site.
You can also chat to our writers and friends by joining us on Discord with this link – Discord Invite
Trophy List
 Obtain all trophies |
 Emerge victorious from your first battle |
Use a Limit Break |
Get Don Corneo to choose Cloud over the two females |
Use a summon Materia in battle |
Raise a Materia to Lv. 5 |
Go on a date with Barret in the Gold Saucer |
Win the Chocobo Racing mini-game |
Score 10,050 points or more in G-Bike at the Gold Saucer |
Have Yuffie join your party |
Have Vincent join your party |
Obtain the Leviathan Materia |
Obtain the Bahamut Materia |
 Obtain 99,999,999 gil |
Reach Lv. 99 with one character |
Obtain the Bahamut ZERO Materia |
Obtain the Knights of the Round Materia |
Learn Omnislash—Cloud’s last Limit Break |
Learn Catastrophe—Barret’s last Limit Break |
Learn Final Heaven—Tifa’s last Limit Break |
Learn Great Gospel—Aeris’s last Limit Break |
Learn Cosmo Memory—Red XIII’s last Limit Break |
Learn All Creation—Yuffie’s last Limit Break |
Learn Slots—Cait Sith’s last Limit Break |
Learn Chaos—Vincent’s last Limit Break |
Learn Highwind—Cid’s last Limit Break |
 Complete FINAL FANTASY VII |
Obtain the Master Summon Materia |
Defeat the Diamond Weapon |
Defeat the Ruby Weapon |
Defeat the Emerald Weapon |
Have your whole party fall in battle |
If you enjoyed this trophy guide, why not check out some more we have?
You can also join us in our Discord, Follow us on Twitter & Subscribe to us on YouTube
