

Trophy Roadmap
Difficulty: 4/10
Estimated time to Platinum: 20 – 25 hours
Trophies: 95. ![]() 1 /
1 / ![]() 2 /
2 / ![]() 12 /
12 / ![]() 80
80
Missable trophies: None
Glitched trophies: None
Difficulty related: None
Playthrough: –
Introduction
Welcome to the Burnout Paradise: Remastered trophy walkthrough!
Burnout Paradise is a racing game developed by Criterion Games and published by Electronic Arts and was officially released on January 22th, 2008 in North America and just three days later on January 25th in Europe for the Sony PlayStation 3 and Microsoft Xbox 360. Burnout Paradise is the seventh game in the Burnout racing series. The previous Burnout games have key features that Criterion put into Burnout Paradise which they thought would be great to pack it all in and have it be featured in an open-world environment.
Burnout Paradise was later ported to the PC (released on February 5th, 2009 in North America along with the European version the very next day, February 6th) as well as a re-release for the Sony PlayStation 3 and Microsoft Xbox 360 (released on February 5th, 2009 exclusively for Europe) all three labeled as ‘Burnout Paradise: The Ultimate Box’ which includes the first patches (Timed Challenges, Online-Exclusive cars [Cagney Update], Time of Day Changes, and the addition of Bikes [Bike Pack]) and the first priced DLC, Party Pack.
Burnout Paradise was re-released as Burnout Paradise Remastered for Playstation 4 and Xbox One in March of 2018 with a second (this time full) release on PC on August 21st, 2018, and a final release on Nintendo Switch (a first since Burnout 2: Point of Impact on Nintendo Gamecube in 2003) on June 19th, 2020. The Remastered version inclused every DLC with the exception of the Time Savers DLC (at time of that release, unlocked every single Main car in the game).

(From PlaystationTrophies.org)
Roadmap
Step 1: Starting
![]() Repair your car
Repair your car
![]() Visit a Paint shop to change your vehicle color
Visit a Paint shop to change your vehicle color
When you start out with the Hunter Cavalry, you’ll have to go through a repair shop for Repair and there is a Paint shop near the junkyard. Go through it for the second.
![]() Power Park your car
Power Park your car
The easiest road would be Watt Street. Can be any percentage so long as it succeeds. Can be done on the Island.
In order for a proper Power Park, find a bunch of parked cars. Some of them are going to be a couple ‘Paradise’ car lengths. These are the parked cars to focus on. In the setup, go at a medium-slow speed and as you approach the two cars, E-Brake into the spot while both keeping a good distance from both vehicles and keeping your car straight. The closer between curb/sidewalk and sidelines and the straighter you are, the higher your score will be.
![]() Visit the Quarry
Visit the Quarry
The Quarry is located under the intersection of West Lake, Hans, South Mountain,
and Geldard and above the “folded” curve of South Mountain that is north of Lone
Stallion Ranch. The main entrance is located by the Geldard / South Mountain
shortcut. There is a Junkyard at the top on Hans Way to make it easier to change
vehicles.
![]() Land a Barrel Roll jump
Land a Barrel Roll jump
![]() Visit the Airfield
Visit the Airfield
![]() Barrel Roll a Toy Car in the Airfield
Barrel Roll a Toy Car in the Airfield
![]() Perform a 180 degree Flat spin
Perform a 180 degree Flat spin
![]() Successfully land your first Super Jump
Successfully land your first Super Jump
![]() Sound the horn on a Silver Lake Super Jump in the Cavalry Bootlegger
Sound the horn on a Silver Lake Super Jump in the Cavalry Bootlegger
Now, this would be as close to a 6 for 1 as possible (maybe?) as it involves the Airfield. There is a junkyard on Nelson and Ross (take 7th Street all the way down through a tunnel) to switch between the Toy Cars (Toy P12 or Toy Manhattan preffered) and the Cavalry Bootlegger (Legendary Cars). There is a super jump in the Airfield and requires some boosted to run up and make the jump. If at first you don’t succeed, don’t worry, try again because after spending over 1250 hours, even I’m not perfect. To activate the horn of the Bootlegger, press the left joystick in like a button (it’s called L3).
The Airfield is located near Ross and Nelson. There is a junkyard at the corner as a main indicator of where you are at. The entrance is a little bit south of the Junkyard. The best way to get here from the city/island is to find/take 7th all the way down, through Lawrence Tunnel, and if you hit East Lake, you have gone too far. If you are at the Naval Yard, it would be taking South Rouse Road up to the Lawrence/Ross/Rouse intersection (tunnel on the right) and turn left. From the main entrance of the Quarry (above the South Mountain fold), take Geldard Drive, left on East Lake Drive, right of Nelson Way and should be on the left side. From Lone Stallion Ranch (below the South Mountain fold), take Casey Pass, go through the shortcut/Gates on the left after the jump (if miss it, turn left at the end on Manners Avenue), take Manners Avenue to the intersection for taking a left onto East Lake Drive, turn right onto Nelson Way, and should be on the left.
How-To’s
Barrel Roll
To achieve a perfect Barrel Roll, look for a split ramp with enough room to pull and land the roll. In order to make the Barrel Roll, you have to set your car up half way between the high split and low split. Make sure you boost the whole way to land the roll. To pull off more Barrel Rolls, hold the Left Stick or Left/Right Arrows to the way you are Barrel Rolling to roll faster or pull away to slow down the roll. Such areas to pull off multiple Barrel Rolls are the Quarry and the Airfield.
Flat Spin
Flat Spins are a necessity to almost everything in Burnout Paradise. From challenges to Stunt Runs, flat spins are easy to achieve and master. At the end of a ramp or cliff, start E-Braking and hold the Left Stick or Left/Right Arrows along with the way you are flat spinning to maximize the end result. The best places to pull a flat spin off are the ramps in the Airfield and Quarry or the jump that bypasses the South Mountain Horseshoe by the Rockridge Dam and Quarry also known as Rockridge Cliff.
![]() Jump Dead Man’s Edge
Jump Dead Man’s Edge
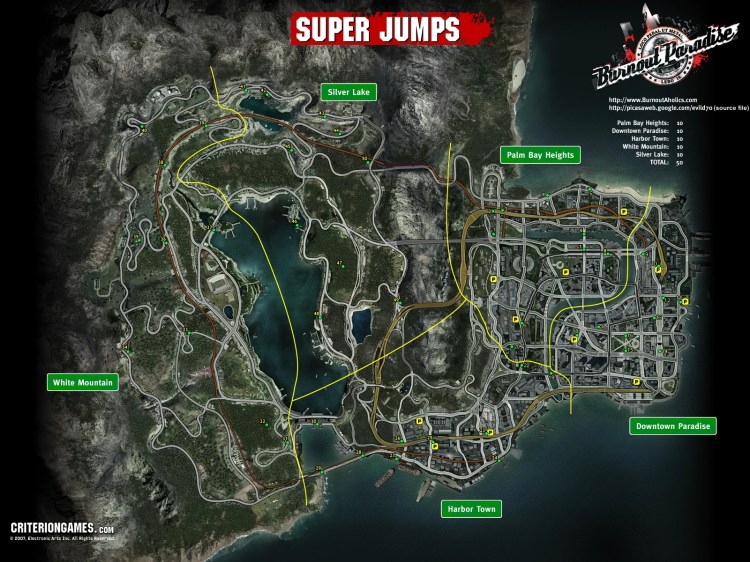
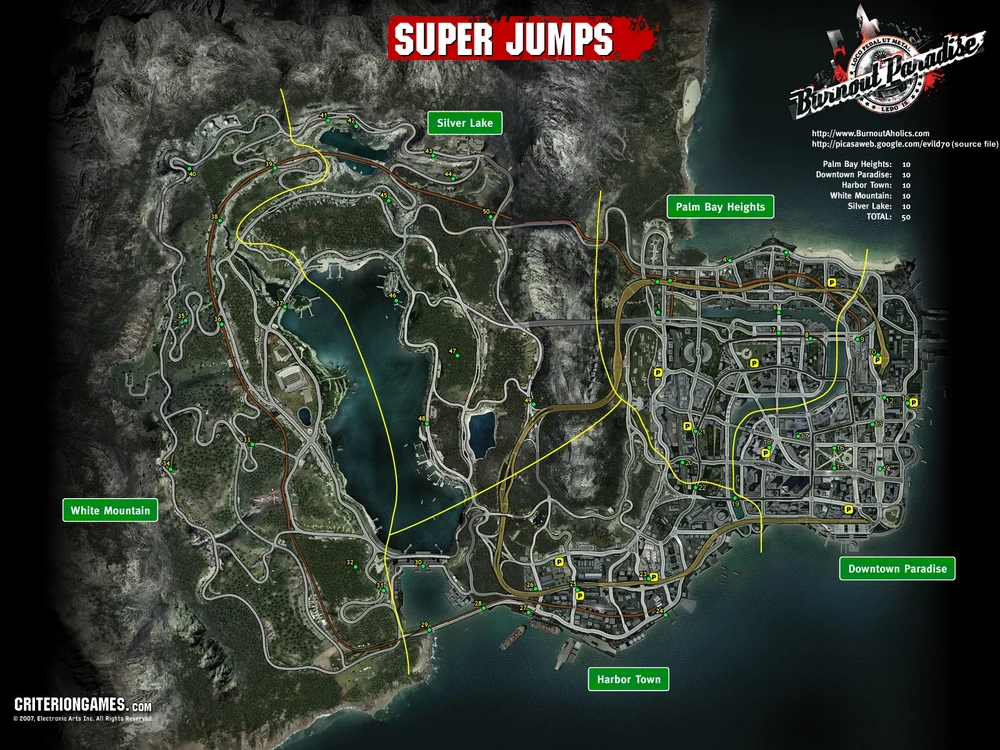
![]() Successfully land 10 Super Jumps
Successfully land 10 Super Jumps
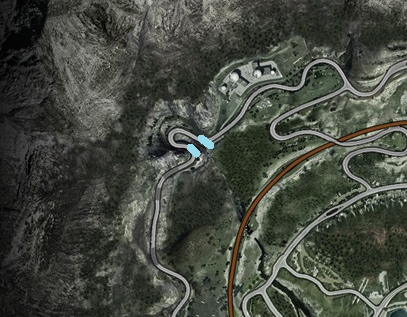
Dead Man’s Edge is in the North most area of the map (Pictured below). It is the “folded” area near the Observatory. When you are on your way there, there may be some super jumps. The super jump locations are scattered throughout Paradise City and see the picture for locations. any 10 will do but they have to be unique and ones you have not jumped yet.

(From PSNProfiles.com)
(From Burnout.Fandom.com/wiki/Burnout_Paradise)
Step 2: Get to know the City
![]() Find all the Events around Paradise City
Find all the Events around Paradise City
The following intersections are all the events throughout the city sorted by event type
Events (Ctrl + F)
a. Races
b. Road Rage
c. Marked Man
d. Stunt Run
e. Burning Routes
a. Races
Rat Race: 2nd and Webster
Riverside Run: Anderson and Glancey
Heads Up: Gabriel and Manners
Driving Off: West Lake and Nelson
High Noon Club: South Mountain and Lucas
Rollercoaster: Young ([sic] Harber) and Hubbard
Avant Guard: Young ([sic] Hamilton) and 1st
Coast to Coast: Warren and Manners
Save Farris: West Crawford and Nelson
Going Coastal: Nelson and Lewis
Plain Sailing: East Crawford and Moore
Waterway to Go: Hubbard and South Rouse
Pleasure Cruise: Young ([sic] Harber) and Lambert
Eastern Promise: Lucas and Schembri
Plaza Endurance: Cannon and Nelson
Stealing 1st: Webster and 7th
Curveball: Lambert and East Crawford
Race for the Plate: South Bay expressway and South Rouse
Call of the Wild: Nelson and Lucas
Baseball Battle: North Rouse and Lewis
Deep South: East Crawford and Hudson
The Duel: Hamilton and 7th
Man O’War: 3rd and Angus
Torpedo Run: North ([sic] South) Mountain and Hans
Hard Fort: North Rouse and Read
Horse Power: 8th and Hudson
Final Furlong: Hamilton and 3rd
Spaghetti Western: Harber and Glancey
Full Gallop: Nelson and Chubb
Demolition Derby: East Lake and Ross
Race to the Summit: Franke and Young
Go West: Newton and East Crawford
Spin City: 1st and Glancey
Catch my Drift: South Bay Expressway and Hall
Power Surge: Chubb (Hans [sic]) and West Lake
Tunnel Vision: Glancey and 7th
Far, Far Away: 2nd and Root
Reach for the Stars: South Rouse and Lambert
Lakeside Getaway: Nelson and East Lake
Mano A Mano: North Mountain and Schembri
b. Road Rage
Oncoming Onslaught: I-88 and Moore
Cross-Town Carnage: Young and Riverside
Franke Exchange: Franke and 5th
Suburban Scrap: Hubbard and 2nd
Motor City Mayhem: Patterson and I-88
Lighthouse Rock: East Crawford and Angus
Angus Wharfare: 4th and Angus
Taking its Toll: I-88 (Sections 1 and 4)
Central Square-Off: King and 2nd
Rush Hour: 3rd and Root
River City Rampage: 4th and Paradise
Wrecking Yard: Lambert and 1st
Blockade Run: South Bay Expressway and Gabriel
Freeway Frenzy: I-88 (Sections 3 and 4 [Right])
Sunset Showdown: Schembri and Chubb
Half Nelson: Ross and Nelson
c. Marked Man
Club Sandwich: Evans and 1st
Emergency 911: 2nd and Hamilton
Mayday, Mayday: Harber and Manners
Rescue Me: South Bay Expressway and Parr
Hostile Waters: Hall and Manners
Strike Out: Hamilton and 5th
Run Home: West Lake and Chubb
Safe Harbor: Watt and Angus
Press Ganged: I-88 (Sections 1 and 2)
Stampede: 3rd and Webster
Steeplechased: 4th and Root
Run Like the Wind: Paradise and 5th
Power Struggle: 2nd and Fry
Seeing Stars: East Crawford and Sullivan
Run to the Hills: King and 3rd
d. Stunt Runs
Lighthouse Party: Patterson and 9th
Bravo, Encore: 3rd and Lambert
Hang 10: Lambert and 9th
Unconventional: Anderson and Angus
Elevation: 1st and Root
Offroad Parking: Lambert and Hall
Over Construction: Harber and Warren
Express Yourself: South Mountain and South Bay Expressway
About Town: Chubb and West Lake
CliffHanger: Chubb and Hans
Falling Down: North Mountain and Uphill
Near the Edge: Nelson and Read
Base Jumper: South Rouse and Ross
Rack ‘Em Up: East Lake and Rack
e. Burning Routes
Hunter Cavalry: East Crawford and Patterson
Hunter Mesquite: Lambert and 5th
Nakamura SI-7 Turbo: Sullivan and 9th
Hunter Vegas: 7th and Franke
Krieger Pioneer: Hamilton and 9th
Nakamura Ikusa GT: 2nd and Glancey
Kitano Hydros Custom: Hubbard and I-88
Hunter Reliable Custom: Nelson and Uphill
Watson R-Turbo Roadster: King and Harber
Rossolini LM Classic: Lambert and 2nd
Hunter Manhattan: Webster and Anderson
Carson Fastback: Harber [near Harber and Root {Auto Repair}]
Carson Grand Marais: Root and Paradise
Montgomery Hyperion: 3rd and Glancey
Krieger 616 Sport: Glancey and 4th
Hunter Spur: Nelson and Rack
Montgomery GT 2400: East Lake and West Crawford
Jansen P12: South Bay Expressway and Shepherd
Carson Inferno Van: 1st and Fry
Rossolini Tempesta: Paradise and Young
Carson Opus: 1st and Webster
Carson Annihilator: Webster and 4th
Jansen X12: Manners and Parr
Kitano Touge Sport: East Crawford and Hamilton
Hunter Takedown 4X4: South Rouse and Hall
Carson 500 GT: Evans and 3rd
Hunter Oval Champ 07: I-88 (Sections 3 and 4 [Left])
Carson GT Concept: Lucas and Hans
Hunter Citizen: Evans and 5th
Watson 25 V16 Revenge: 3rd and Fry [6-Point Intersection]
Montgomery Hawker: 2nd and Angus
Krieger Überschall 8: 5th and Root
Carson Thunder Custom: Lambert and Lawrence
Carson Hot Rod Coupe: West Lake and Cannon
Krieger WTR: I-88 (Sections 2 and 3)
![]() Find all Island Events
Find all Island Events
This is within the island and should be easy enough
a. Big Surf Races [(x2) Indicates Two Laps]
(x2) Shore Thing: Daniell and Pitt
(X2) Sunset Scramble: Grange and Pitt
(X2) Rocket Science: Huntley and McDonald
There and Back: Shires and Paradise Keys
b. Big Surf Road Rages
You Got Surfed: Daniell and Shires
Tropical Thunder: Pitt and Lipscomb
Road Warrior: Jacobs and McDonald
c. Big Surf Marked Man
Weakened Getaway: McDonald (and Lipscomb [sic])
Island Retreat: Shires and Huntley
d. Big Surf Stunt Run
Show-Boating: Shires and Glover
Makin Waves: Huntley and Jacobs
Ski Stuntday: Maguire (next to Maguire Gas Station and Lighthouse)
e. Big Surf Burning Routes
Carson Dust Storm: Grange and Shires
f. Island Tour [Marked as Burning Routes]
Tour of Duty: Shires and Lipscomb
Tour de Force: McDonald and Griffin
![]() Visit all the Car Parks in Paradise City
Visit all the Car Parks in Paradise City
Here is the list of all the Car Parks around Paradise City. They are all located within Palm Bay Heights, Downtown, and Harbor Town. To get the trophy, you need to go into the parking garage by crashing the gate at the entrance and head up to the top.
Car Parks
Hudson and East Crawford
Webster [near 7th and Webster {Paint Shop}]
Angus and 4th
Young and Franke
Lambert and 5th
Hamilton and Young
Lambert and Hall
Manners and Shepherd
Hall and Manners
Fry [6-Point Intersection of 3rd, Fry, Paradise, & Franke]
1st and Glancey
Step 3: Some Events
This should give a good feel
![]() Earn your ‘D’ Class License
Earn your ‘D’ Class License
Complete 2 of the following trophies in any order to achieve this trophy
![]() Win a Stunt Run in the P12 88 Special
Win a Stunt Run in the P12 88 Special
![]() Beat the target score in Stunt Run
Beat the target score in Stunt Run
![]() Score over 50,000 in a Stunt Run
Score over 50,000 in a Stunt Run
Stunt Run is do as many cool tricks with the car and rack up as many points and multipliers as possible. Repeating tricks and ramps will not give you multiple multipliers, unless it’s the opposite side like in the Quarry or on Big Surf Island within the Construction Area.
Win Stunt Run with P12 88 Special is easy if done early on and starting at Express Yourself at the intersection of South Bay Expressway and South Mountain Drive – pretty much the southwest most point between the city and the country.
The tip for that is the Expressway has several ramps to flat spin off of with billboards which would yield enough for the 50,000 Score. Just don’t crash.
![]() Survive a Marked Man in the Extreme Hot Rod
Survive a Marked Man in the Extreme Hot Rod
![]() Survive a Marked Man
Survive a Marked Man
![]() Perform 3 Takedowns (?)
Perform 3 Takedowns (?)
Marked Man is a mixture of Road Rage and a Race. You have to race to the point while surviving being taken down without taking too much damage.
The best bet for this is Safe Harbor Marked Man since it is pretty much a dog leg line (with shortcuts) to finish. It is located at the intersection of Watt & Angus near the initial Junkyard you started out at. I recommend doing this as early as possible to have the computer be as easy as possible.
![]() Drive through a Repair Shop during a Road Rage
Drive through a Repair Shop during a Road Rage
![]() Perform 3 Takedowns
Perform 3 Takedowns
Road Rage is take down as many other vehicles as possible before time runs out or you take too much damage.
The best starting starting location is Lighthouse Rock (East Crawford and Angus). It will start you the opposite direction but you are able to turn around and go to the repair shop.
For the takedowns, they are as a total throughout the entire game and cumulative between Marked Man and Road Rage so if you got 1 in Marked Man, the trophy will trigger after getting 2 in Road Rage.
![]() Win a Race in a Toy Car
Win a Race in a Toy Car
![]() Win a Race
Win a Race
![]() Visit a Gas Station during a Race
Visit a Gas Station during a Race
Races are exactly that. Race from point A to point B and come in first.
The best way for the Race is with the Toy Citizen at the Race for the Plate (South Bay Expressway and South Rouse) and go through the Gas Station for these trophies.
![]() Shutdown the Nakamura SI-7
Shutdown the Nakamura SI-7
After completing the third event, the Naklamura SI-7 will be available to be taken down. Take it down to get this trophy.
![]() Complete your first Island Tour
Complete your first Island Tour
There are 2 Island Tours on Big Surf Island. Complete one of them to grab this trophy.
Tour of Duty: Shires and Lipscomb // Time: 1:35
Tour de Force: McDonald and Griffin // Time: 1:55
![]() Set a Time Road Rule on any road (?)
Set a Time Road Rule on any road (?)
![]() Set 10 Time Road Rules (?)
Set 10 Time Road Rules (?)
After these 4-5 events, Showtimes and Times for each Road should now be unlocked. You can do them now or later but you will eventually unknowingly get the Time Road Rule trophies online unless you are ACTIVELY going off the beaten path.
Step 4: Online
The first section would be challenges, the second being Events, the third is Cops & Robbers, and finally ending with Miscellaneous
To start Challenges and Events, when you are hosting an online lobby, it would be Right on the D-Pad and then the 2 main choices to look out for are Challenges and Events. If you want to continue and get the online exclusive vehicles after everything is done, be ready to choose the “View Players” to select a player and kick them when they aren’t doing any challenges.
Section 1 – Challenges
![]() Complete a Freeburn Challenge
Complete a Freeburn Challenge
![]() Light up the Manhattan Spirit during an Online Challenge
Light up the Manhattan Spirit during an Online Challenge
![]() Jump through Deese’s Donut
Jump through Deese’s Donut
![]() 4.5 seconds of Crash TV Air Time
4.5 seconds of Crash TV Air Time
![]() Complete a 750 yard drift inside the Inspiral Car Park
Complete a 750 yard drift inside the Inspiral Car Park
![]() Jump over another Player’s Car
Jump over another Player’s Car
![]() Land 5 Island Mega Jumps
Land 5 Island Mega Jumps
![]() Complete 10 Freeburn Challenges
Complete 10 Freeburn Challenges
![]() Complete all 10 Island Freeburn Challenges
Complete all 10 Island Freeburn Challenges
Drive the Manhattan Spirit under Legendary Cars in the Junkyard. To activate the sirens, press the left joystick in like a button (L3)
Here are the 10 challenges for Big Surf Island. They can be done with 2 players and are in order.
Island // #1 // Jumpin’ Donuts: Jump through Deese’s Donut.
Island // #2 // Drain Jump // Part 1: Meet in the storm drain. // Part 2: Spend 10 seconds in the air, anywhere.
Island // #3 // Steam Rollers: Everybody land two barrel rolls on the beach.
Island // #4 // Crane in the Neck // Part 1: Meet on the roof of the Holness Hotel. // Part 2: Jump off the left-hand crane’s Mega Jump.
Island // #5 // Lighthouse Rock // Part 1: Meet at the university dome. // Part 2: Jump through the lighthouse.
Island // #6 // Hang Time! // Part 1: Meet at the bottom of the Crash TV Ski Jump. // Part 2: For all drivers, jump together off the Crash TV Ski Jump
Island // #7 // Hoop-la: Jump through the double circle at the Shires construction site.
Island // #8 // Walk the Plank // Part 1: Park on the tip of the walkways above the construction site. // Part 2: Land the Mega Jump.
Island // #9 // I Spiral: Everyone get 1500 yards of drift and 3 near misses in the Inspiral Car Park.
Island // #10 // Jumpers: Jump above the Paradise Keys Bridge structure.
With #9, how to drift, when you are speeding towards a turn you need to make, just lightly tap the brake button to make a wide drift around a turn or press the brake to make a tight drift.
![]() Complete your first Timed Challenge
Complete your first Timed Challenge
![]() Complete 10 Timed Challenges
Complete 10 Timed Challenges
![]() Complete a Timed Challenge using all 3 Boost types in the Hawker Mech
Complete a Timed Challenge using all 3 Boost types in the Hawker Mech
To change the boost, press the left joystick in (L3)
2 Player // Timed // #1 // Slam Dunk // Time: 2:08 // Part 1: Meet inside the Big Surf Basketball Court // Part 2: Get to the Hamilton Car Park and jump as quick as possible
2 Player // Timed // #2 // Time Travel // Time: 2:15 // Part 1: Meet up by the steps of Central Station // Part 2: Rush to the Downtown Park Fountain and every driver get 1,000 yards of Drift
2 Player // Timed // #3 // Racking Up Reverse // Time: 2:15 // Part 1: Meet at the Angus Boat Hire in Heartbreak Hills // Part 2: Each driver, get 1,000 yards of Reverse Driving in one go, along Rack Way. The clock is ticking!
2 Player // Timed // #4 // Free Fall Fix // Time: 4:30 // Part 1: Score a Vertical Takedown on each other in the West Crawford Tunnel // Part 2: Both drive through the Auto-Repair on Nelson Way, as fast as you can
2 Player // Timed // #5 // Tran-sports // Time: 5:15 // Part 1: Meet up inside the Wildcats Baseball Stadium // Part 2: Use the ramps on the Fry Avenue Car Park to meet up on the roof of the DJR Sports Store
2 Player // Timed // #6 // Partners in Time // Time: 1:52 // Part 1: Each driver get 3 Aerial Near Misses using the ramps on the Big Surf Beach // Part 2: Jump over each other using the ramps on the Big Surf Beach
2 Player // Timed // #7 // Aerodynamics // Time: 7:30 // Part 1: As a team, get into the Airfield and land 8 Barrel Rolls // Part 2: Every driver lands a Barrel Roll through the Grey hoop to stop the clock
2 Player // Timed // #8 // Flying Banners // Time: 4:30 // Part 1: Meet up inside the Airfield // Part 2: Smash 10 Billboards before time runs out
2 Player // Timed // #9 // Chopper Race // Time: 3:00 // Part 1: Meet up in the Heli Pad Car Park along North Rouse Drive // Part 2: Everyone race to get inside Tindle’s Mine before time runs out
2 Player // Timed // #10 // Look Behind You // Time: 3:45 // Part 1: Meet up at the Observatory // Part 2: Every driver get 2,000 yards of Oncoming whilst driving in reverse on Read Lane, but hurry
![]() Complete 5 Bike Challenges
Complete 5 Bike Challenges
![]() Complete a Bike Timed Challenge using the Toy Bike
Complete a Bike Timed Challenge using the Toy Bike
Bikes are a hassle but the challenges for 2 Players should be simple. To pop a wheelie, hold [NOT press] down on the Left Stick.
2 Player // Timed // #1 // Pier Fear // Time: 2:00 // Part 1: Meet up in the warehouse off South Bay Expressway and South Rouse Drive // Part 2: Race east to take the dock-side Super Jumps
2 Player // Freeburn // #1 // Easy Rider // Each rider travel 2,000 yards in Downtown without crashing
2 Player // Freeburn // #2 // Night Parade // Each rider Wheelie over 60 yards in Oncoming traffic at the same time, along 9th Street
2 Player // Freeburn // #3 // Laid Back // Each rider pop a Wheelie of 500 yards along I-88
2 Player // Freeburn // #5 // Wheelie Hard // Each rider jump over the train carriages in western South Bay
Section 2 – Events
![]() Take part in an Online Stunt Run
Take part in an Online Stunt Run
![]() Take part in an Online Marked Man
Take part in an Online Marked Man
![]() Be on the Blue team for Online Road Rage
Be on the Blue team for Online Road Rage
![]() Be on the Red team for Online Road Rage
Be on the Red team for Online Road Rage
For these events, all that needs to be done is choose the proper event, (if Road Rage, start it) wait for it to start, then cancel. The trophy should unlock after the start of the event.
Section 3 – Cops & Robbers
Easiest way would be in 2 runs minimum, 4 maximum if the second player doesn’t have the trophies and there is only 2 players.
This section is optional but needed for 100%
![]() Be the first to reach the Gold
Be the first to reach the Gold
![]() Pick up dropped Gold
Pick up dropped Gold
![]() Bank the Gold
Bank the Gold
![]() Take down the Gold carrier
Take down the Gold carrier
![]() Win a game on the Cops team
Win a game on the Cops team
![]() Win a game on the Robbers team
Win a game on the Robbers team
![]() Win a best of five rounds game
Win a best of five rounds game
![]() Win a game driving the Watson R-turbo Roadster
Win a game driving the Watson R-turbo Roadster
First run would be:
Car: Watson R-Turbo Roadster
Rounds: 5
2nd player would stop short for the first spawn (and NOT pick up the gold), 1st player gets the gold, crashes, 2nd picks the gold up, 1st takedown 2nd, picks up the gold, and brings it back
If 2nd doesn’t have other trophies, the roles would be reversed for 1 round.
After that, just grab the gold and bring it back a total of 3 times
![]() 8 Players meet in the Wildcats’ Baseball Stadium
8 Players meet in the Wildcats’ Baseball Stadium
![]() Ride 10 miles on a bike in an 8 player lobby
Ride 10 miles on a bike in an 8 player lobby
These 2 trophies are the most difficult when getting the Platinum and full 100% but super simple. They could be done separate or together. Car Lobby would be Freeburn Challenge #2 for 8 players but with a Bike Lobby, they all have to know where to go.
The 10 miles in 8 Player Lobby is (almost) as easy as it sounds. Just need to ride for 10 cumulative miles in an 8 player lobby and the achievement will be awarded.
There is a crew who is able to help on Discord (Burnout Paradise Remastered) where there are Playstation Users who are happy to help.
Step 5: Bikes
This section is optional for the platinum but needed for 100% and should take about 3 hours
![]() Complete any Bike Day Road Rule
Complete any Bike Day Road Rule
![]() Complete any Bike Night Road Rule
Complete any Bike Night Road Rule
Get a personal best on a single road in Paradise City. Does not matter if it is the same one so long as one is Day and the other is Night.
![]() 24 hours in Paradise on a bike
24 hours in Paradise on a bike
Within the Settings, change the Time of Day to 24 Minute and either create an online lobby set to invite lobby and wait 24 minutes or offline as you complete the Day and Night Events (Burning Rides and Midnght Rides). I recommend doing the online as it is easier to get Burning Routes and Midnight Routes done in a string of not worrying about being late to one event.
![]() Ride 50 Miles Offline on a bike
Ride 50 Miles Offline on a bike
![]() Earn 100% on your Bike License
Earn 100% on your Bike License
Ride 50 Miles will come as you play the Bike Section and complete the Bike License
100% of the Bike License consists of completing the following events along with getting a personal best on every road Day and Night (128 times total)
A.) Burning Rides (8:00am – 7:59pm)
9th and Hudson
Newton and East Crawford
North Rouse and Lewis
Nelson and Lewis
Ross and Nelson
Nelson and Read
West Lake and Cannon
Chubb and West Lake
Nelson and Uphill
West Lake and Chubb
Chubb (Hans [sic]) and West Lake
South Bay Expressway and Parr
Hall and Manners
South Rouse and Lambert
Hubbard and South Rouse
1st and Fry
Harber
Anderson and Angus
Nelson and East Lake
B.) Midnight Rides (8:00pm – 7:59am)
3rd and Root
Franke and Young
I-88 (Sections 1 and 2)
I-88 (Sections 3 and 4)
2nd and Hamilton
Harber and Glancey
Young and Lambert
South Bay Expressway and Hall
South Mountain and South Bay Expressway
Chubb and Hans
Lucas and Hans
North Mountain and Uphill
Cannon and Nelson
Nelson and Rack
South Rouse and Ross
East Lake and West Crawford
West Crawford and Nelson
South Mountain and Lucas
North Rouse and Read
Step 6: Party Pack
This section is optional for the platinum but needed for 100% and should take about an hour and a half at most.
![]() Complete a Massive Party
Complete a Massive Party
![]() Complete your 1st Party Round
Complete your 1st Party Round
![]() Every player succeeds in a Party Round (?)
Every player succeeds in a Party Round (?)
When starting up, there is a menu that has 3 options: Enter Paradise City // Start a Party // Big Surf Island
Choose the Start a Party, D-Pad left once, Options button, D-Pad left once again, go down to each Random and use the D-Pad to select Skill for each, Options button once more. This will set up and start an 8 player, 8 Round where you only have to wait 1 minute before the next player is up. This is the most tedious trophy but you won’t ever have to do this again.
Complete 1st Party Round will trigger after the first Round has completed.
The time to complete 1 round should be about 8 minutes and times 8 rounds should run at most 64 minutes or a little over an hour
If you come across the “Stay on Target” game, the “Every Player succeeds in a Party Round” trophy would arrive. Unsure if “Swimming Up Stream” would trigger the trophy.
![]() Complete a Big Party
Complete a Big Party
![]() Every player succeeds in every Party Game (?)
Every player succeeds in every Party Game (?)
![]() Every player succeeds in a Party Round (?)
Every player succeeds in a Party Round (?)
After that, would have a party where it would be 5 players at 1 round on skill for a 10 minute trophy. Can be any game so long as it gets completed. Could do the Skill and wait it out or do the game and get at least the “Every player succeeds in every Party Game” trophy early and the “Every Player succeeds in a Party Round” trophy, if “Stay on Target” game was not played through.
![]() Complete a Small Party
Complete a Small Party
![]() Every player succeeds in every Party Game
Every player succeeds in every Party Game
![]() Every player succeeds in a Party Round
Every player succeeds in a Party Round
Once done, a 2 player game with 1 round would do the trick for the remaining trophies.
Step 7: Clean Up
![]() Enter a Road Rage in the Carson Inferno Van
Enter a Road Rage in the Carson Inferno Van
Enter a Road Rage with the PCPD Inferno Van to unlock this trophy. No need to complete, just start and it’ll unlock.
![]() Drive 750 miles
Drive 750 miles
![]() Earn your ‘C’ Class License
Earn your ‘C’ Class License
![]() Earn your ‘B’ Class License
Earn your ‘B’ Class License
![]() Earn your ‘A’ Class License
Earn your ‘A’ Class License
![]() Shutdown the Carson Inferno Van
Shutdown the Carson Inferno Van
![]() Earn your ‘Burnout’ Driving License
Earn your ‘Burnout’ Driving License
These 7 would be more complete events to advance the License, takedown the Carson Inferno Van, and start a Road Rage in said Van. The 750 Miles would come as you would play the game so it isn’t missable. Should reach that by about the B or A License.
Learner: Start With
D: 2 Wins
C: 7 Wins (Total: 9)
B: 15 Wins (Total: 24)
A: 26 Wins (Total: 50)
Burnout: 40 Wins (Total: 90)
Burnout Elite: 120 Wins [minus Burning Routes Completed] (Total: 183-210)
Minuimum: 93 Wins [All subsequent Burning Routes Completed]
For the base game, there are 7 types of Licenses. The first License is the Learners Permit in which you need 2 wins to get a D Class License. Between the D Class License and the Burnout License are the “Letter Licenses” going from D to A.
Getting to the C Class License, you need the 2 wins from the Learners Permit to get to the D Class License, then 7 wins to upgrade the D Class License to the C Class License. The B Class License requires 15 wins on top of that then the A Class License needs another 26.
The Burnout License adds 40 more events once the A Class License has been earned then after the Burnout License is acquired, there is a special License to trek ALL of Burnout Paradise. That License is the Elite License which requires ALL events to be won (the end number depends on the number of Burning Routes you have previously completed). The final number ranges between 183 and 210. The 183 is all of the available 27 Burning Routes have been completed and 210 is based off that you did not get a single Burning Route.
![]() Score a Burnout Chain of x2
Score a Burnout Chain of x2
![]() Score a Boost Chain of x3 in the GT Nighthawk
Score a Boost Chain of x3 in the GT Nighthawk
![]() Score a Burnout Chain of x4
Score a Burnout Chain of x4
![]() Drive on the wrong side of the road for 547 yards
Drive on the wrong side of the road for 547 yards
These can be done bafore or after the above 7 but with the exception of the Nighthawk, can be done during Burning Routes.
A bit challenging but doable along the right most and south most sides of the map and can be coincided with the x2 and x4 burnout chain trophies and Drive on Wrong Side for 547 Yards.
Just push and hold X when the Boost is good while holding R2 (for better grip) and make sure to do it in oncoming traffic and watch for traffic.
![]() Complete 5 Burning Routes
Complete 5 Burning Routes
This one would be unlocked after you complete your 5th Burning Route which would count towards one of your License advancements so I would recommend doing this during the D License since you will have enough vehicles to run these.
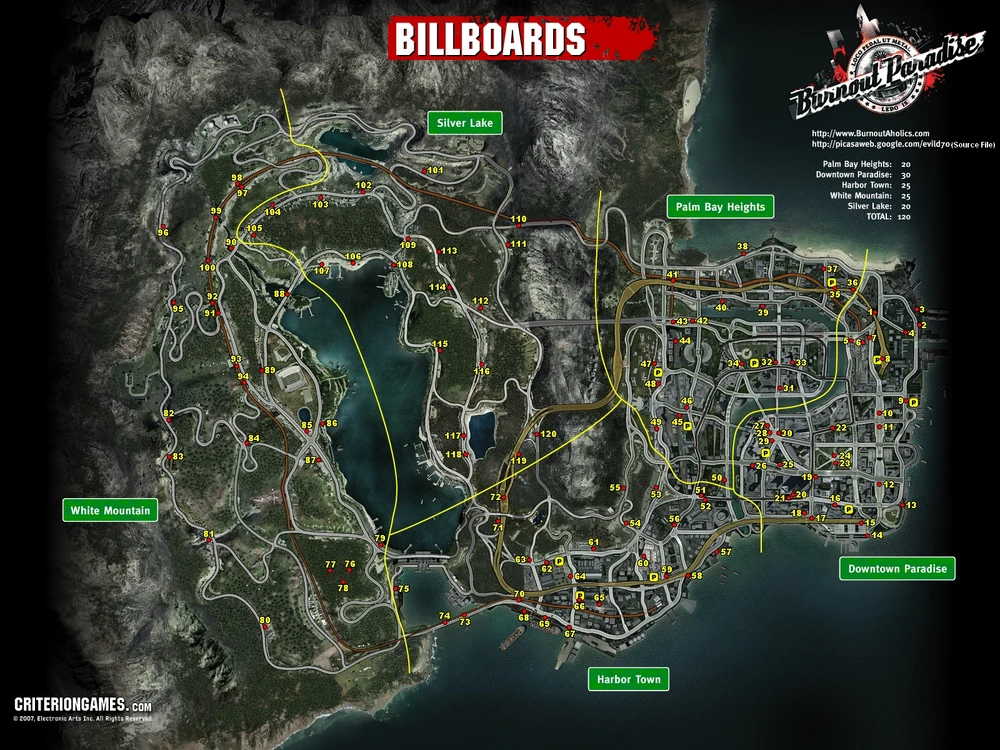
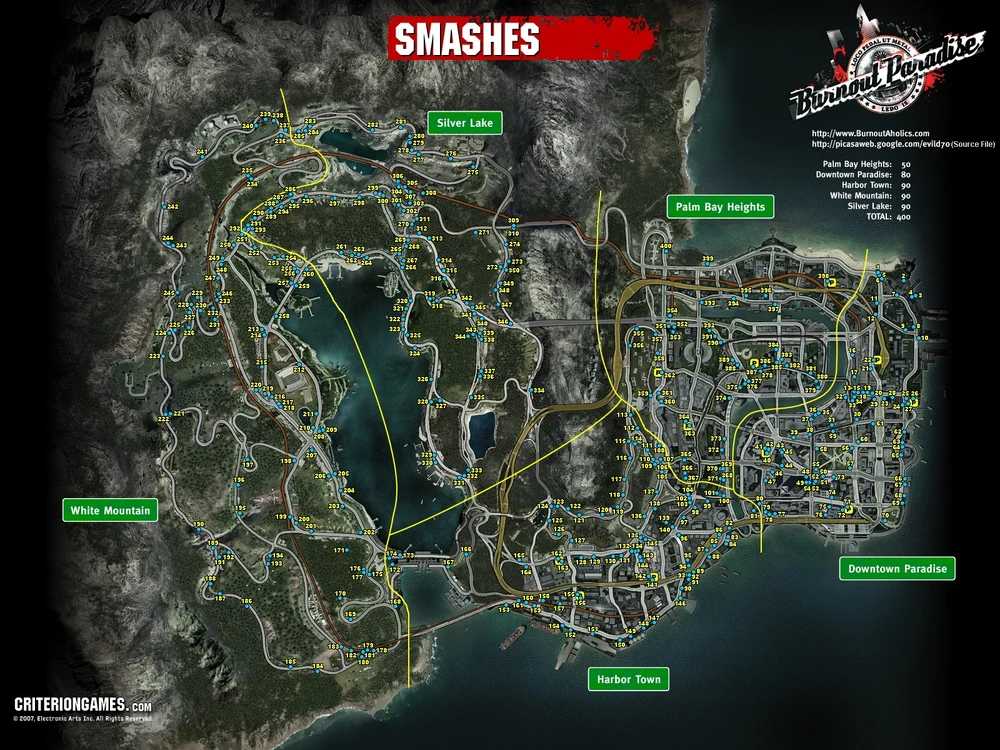
![]() Smash 3 Burnout Billboards
Smash 3 Burnout Billboards
![]() Smash 30 Burnout Billboards
Smash 30 Burnout Billboards
![]() Smash 60 Burnout Billboards
Smash 60 Burnout Billboards
![]() Drive through 10 sets of Yellow Smash Gates
Drive through 10 sets of Yellow Smash Gates
![]() Drive through 50 sets of Yellow Smash Gates
Drive through 50 sets of Yellow Smash Gates
![]() Drive through 200 sets of Yellow Smash Gates
Drive through 200 sets of Yellow Smash Gates
Throughout Paradise City, there are several billboards and gates littered all about. You might end up finding some when doing the 7 above but if you want to take care of them before or after, here are the locations for each throughout each sector. Smash on through them (within a reasonable speed as the gates are known to glitch at higher speeds) to collect them.

(From Burnout.Fandom.com/wiki/Burnout_Paradise)
(From Burnout.Fandom.com/wiki/Burnout_Paradise)
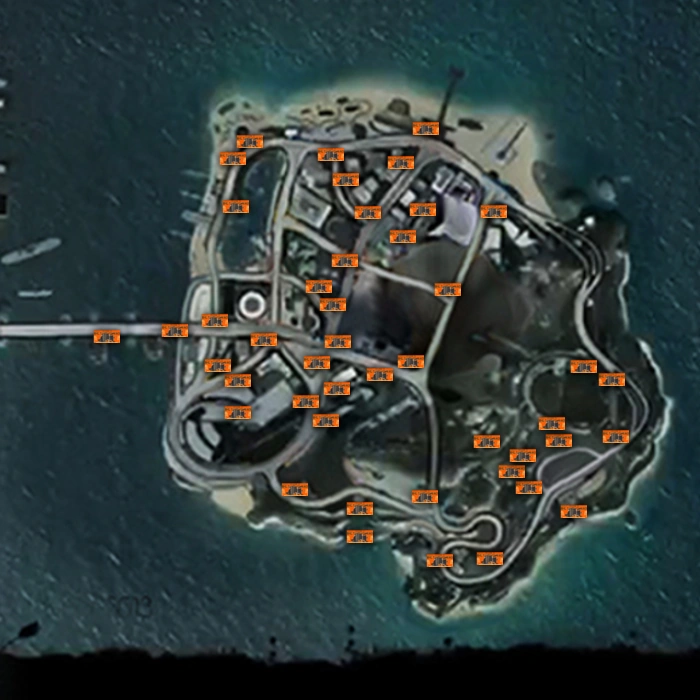
![]() Smash 15 Island Billboards
Smash 15 Island Billboards
![]() Smash all 45 Island Billboards
Smash all 45 Island Billboards
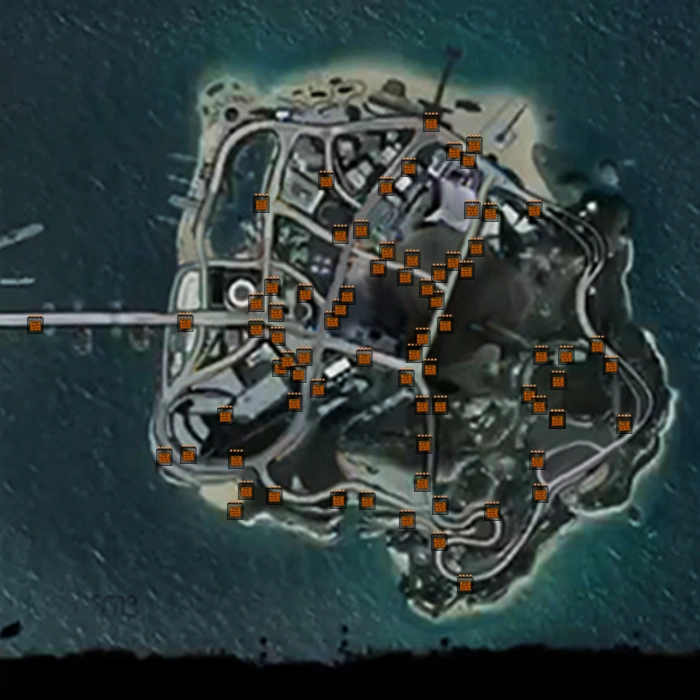
![]() Drive through 20 Island Smash Gates
Drive through 20 Island Smash Gates
There are Billboards and Gates on Big Surf Island as well. If you want to get these done before or after the 7 above as well is up to you as you’ll smash through them when going through a couple events on the island

(From Burnout.Fandom.com/wiki/Burnout_Paradise)

(From Burnout.Fandom.com/wiki/Burnout_Paradise)
![]() Set a Showtime Road Rule on any road
Set a Showtime Road Rule on any road
![]() Score a x3 Multiplier in Showtime
Score a x3 Multiplier in Showtime
![]() Score a x5 Multiplier in Showtime
Score a x5 Multiplier in Showtime
![]() Set 10 Showtime Road Rules
Set 10 Showtime Road Rules
![]() Set a Time Road Rule on any road
Set a Time Road Rule on any road
![]() Set 10 Time Road Rules
Set 10 Time Road Rules
These 6 can be done after completing about 4-5 events, whether in the D License or from the Island and can be done split between the Paradise City and Big Surf Island. I recommend doing it on the island due to the Showtimes being lower than the Tri-County area (Palm Bay Heights / Harbor Town / Downtown) and still be able to acquire the trophies.
Step 8: Celebrate
![]() Burnout Paradise Elite
Burnout Paradise Elite
Congratulations on the Platinum and 100% of Burnout Paradise Remastered.
For a more detailed Strategy Guide/Walkthrough, please see the GameFAQs guide here.
If you liked this guide, you’ll find more on our site.
You can also chat to our writers and friends by joining us on Discord with this link – Discord Invite
Trophy List
 Awarded for successfully collecting all trophies from Burnout Paradise |
 Awarded for driving through any Auto Repair |
Awarded for beating any of the original Time Road Rule scores |
Awarded for beating any of the original Showtime Road Rule scores |
Awarded for winning any Offline Race |
Awarded when you smash through your 3rd pristine Burnout Billboard |
 Awarded when you smash through your 30th pristine Burnout Billboard |
 Awarded when you smash through your 60th pristine Burnout Billboard |
Awarded when you drive through your 10th set of Yellow Smash Gates |
Awarded when you drive through your 50th set of Yellow Smash Gates |
Awarded when you drive through your 200th set of Yellow Smash Gates |
Awarded when you receive your ‘D’ Class License |
Awarded when you receive your ‘C’ Class License |
Awarded when you receive your ‘B’ Class License |
Awarded when you receive your ‘A’ Class License |
Awarded when you receive your ‘Burnout’ Driving License |
Awarded when you Shutdown the Nakamura SI-7 |
Awarded for reaching a x3 Multiplier in Showtime |
Awarded for reaching a x5 Multiplier in Showtime |
Awarded for performing your third Takedowns. |
Awarded for driving through an Auto Repair during any Offline Road Rage. |
Awarded for performing a “Flatspin” of at least 180 degrees. |
Awarded when you successfully land your 1st Super Jump. |
Awarded for achieving your first Boost Chain of x2. |
Awarded for achieving your first Boost Chain of x4. |
Awarded for winning any Offline Marked Man. |
Awarded for winning any Offline Stunt Run. |
Awarded for successfully “Power Parking” your car between two other vehicles. |
Awarded when you set your 10th Showtime Road Rule. |
Awarded when you set your 10th Time Road Rule. |
Awarded when you complete your 5th Burning Route. |
Awarded for driving a distance of 547 yards in Oncoming Traffic in one go. |
Awarded when you “Shutdown” the Carson Inferno Van. |
Awarded for scoring over 50,000 in any Offline Stunt Run. |
Awarded when you successfully land your 10th Super Jump. |
Awarded for successfully landing a Barrel Roll jump. |
Awarded when you have discovered every event in Paradise City. |
Awarded when you discover every Car Park in Paradise City. |
Awarded when you reach a total car distance driven of 750 miles. |
Awarded when you complete your 1st Freeburn Challenge. |
Awarded for driving through a Gas Station during any Offline Race. |
Awarded for driving through any Paint Shop to change your vehicle color. |
Awarded for entering any Offline Road Rage in the Carson Inferno Van. |
Awarded for visiting the Airfield in Silver Lake. |
Awarded for visiting the Quarry in White Mountain. |
Awarded when you first jump over Dead Man’s Edge in White Mountain. |
Awarded for jumping over another player’s car in an online game. |
Awarded when you complete your 10th Freeburn Challenge. |
Awarded for meeting up with 7 other players inside the Wildcats’ Baseball Stadium in an online game. |
Awarded for taking part in an Online Stunt Run. |
Awarded for taking part in an Online Marked Man. |
Awarded for taking part in an Online Road Rage as a Runner on the Blue Team. |
Awarded for taking part in an Online Road Rage as a Chaser on the Red Team. |
Awarded when you complete your 1st Timed Challenge. |
Awarded when you complete your 10th Timed Challenge. |
Awarded when you reach a total bike distance ridden of 50 miles. |
Awarded when you set your 1st bike Day Road Rule. |
Awarded when you set your 1st bike Night Road Rule. |
Awarded for spending a full 24 hour day and night cycle riding a bike. |
Awarded for riding 10 miles on a bike in an 8 player online game. |
Awarded when you complete your 5th Freeburn Challenge on a bike. |
Awarded when you reach 100% complete on your Bike License. |
Awarded when every player successfully completes a Party Round. |
Awarded when you complete the 1st Round of your 1st Party. |
Awarded upon completing a Party in which every player successfully completes every Game of every Round. |
Awarded when 2-4 players have completed a Party. |
Awarded when 5-7 players have completed a Party. |
Awarded when 8 players have completed an 8 Round Party. |
Awarded for winning any Offline Stunt Run driving the P12 88 Special |
Awarded for using the flashing lights of the Manhattan Spirit during an Online Freeburn Challenge or Timed Challenge |
Awarded for achieving a Boost Chain of x3 driving the GT Nighthawk |
Awarded for sounding the horn and successfully landing a Super Jump in Silver Lake driving the Cavalry Bootlegger |
Awarded for winning any Offline Marked Man driving the Extreme Hot Rod |
Awarded when you complete any Timed Challenge driving the Hawker Mech having used all 3 boost types |
Awarded for winning any Offline Race driving any of the Toy Cars |
Awarded for successfully landing a Barrel Roll in the Airfield driving any of the Toy Cars |
Awarded when you complete any Timed Challenge using the Toy Bike |
Awarded for being the first player in an Online Cops and Robbers game to pick up the gold. |
Awarded for successfully picking up the Gold once it has been dropped in an Online Cops and Robbers game. |
Awarded for successfully delivering the Gold to your team base in an Online Cops and Robbers game. |
Awarded for successfully performing a Takedown on the player carrying the Gold in an Online Cops and Robbers game. |
Awarded for being on the winning Cops team in an Online Cops and Robbers game. |
Awarded for being on the winning Robbers team in an Online Cops and Robbers game. |
Awarded for being on the winning team of a best of five round game of Online Cops and Robbers. |
Awarded for being on the winning team of an Online Cops and Robbers game driving the Watson R-Turbo Roadster. |
Awarded when you drive through your 20th set of Orange Island Smash Gates |
Awarded when you smash through your 15th pristine Island billboard |
Awarded when you successfully land your 5th Island Mega Jump |
Successfully land the Island Mega Jump through Deese’s Donut |
Successfully land the Island Mega jump from the Crash TV Ski Jump and get at least 4.5 seconds of Air Time |
Awarded when you complete a continuous 750yd drift inside the Inspiral car Park |
Awarded when you successfully complete your first Island tour |
Awarded when you find all 15 events on Big Surf Island |
Awarded when you successfully complete all 10 Island Freeburn Challenges. These can be completed by 2 -8 players |
Awarded when you’ve smashed through all 45 billboards |
If you enjoyed this trophy guide, why not check out some more we have?
You can also join us in our Discord, Follow us on Twitter & Subscribe to us on YouTube
